Sera’s Blog 2016
You can now follow the latest news from Staples & Vine with Sera’s Blog.
Updates from the workbench with news on the latest aircraft being sculpted.
I hope you enjoy the blog and I appreciate your feedback.
You can email me directly via sera@staplesandvine.com
 You can keep up to date with my news by following me in the social media links at the bottom of the page.
December 22nd 2016
Well that just about wraps up 2016 for us. It has been quite a rollercoaster year. So much has happened with so many new developments. I am currently working on production, completing orders for Spitfire prototypes and Fw190D-9s which will be dispatched in the first week of 2017. Then I have a few more orders to complete, and then on to the Tiger. 2017 will be a big year for us as it will be our 20th anniversary so you can expect some exciting new projects. I will be at Furhall setting up some of these over the Christmas break so make sure you keep up to date with our news via the blog, Twitter, Instagram, or Facebook in the new year.
Finally thanks to everyone for following us on social media and thanks to all our customers. I hope you have enjoyed the blog and wish you all a very merry Christmas and a happy new year.
November 23rd 2016
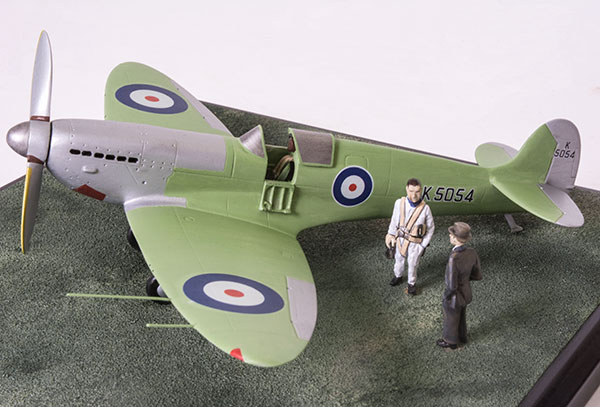
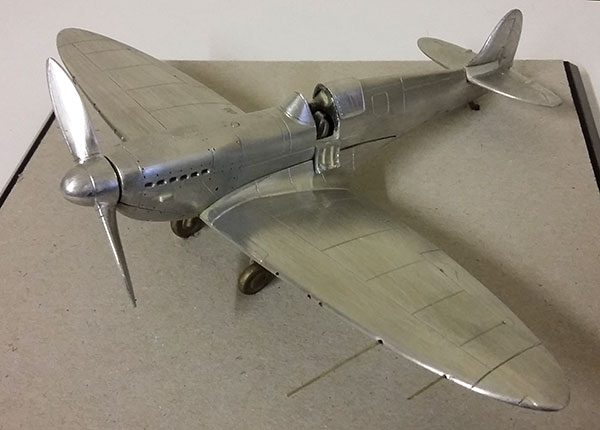
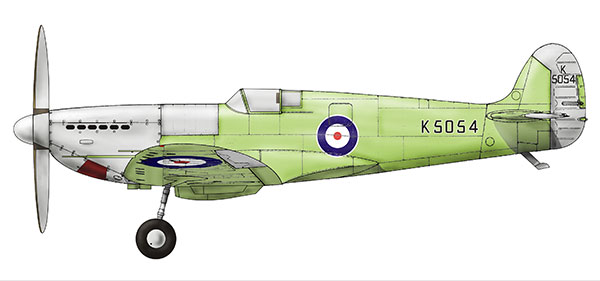
The Spitfire Prototype K5054 is now in production and the final result has been well worth the head scratching and painstaking research. K5054 is finished in natural aluminium, zinc chromate primer, and silver doped canvas as it first flew on March 5th 1936. The figures have come out particularly well representing R J Mitchell and Mutt Summers. This limited edition of 50 only has only been possible with our new bronze undercarriage giving the aircraft extra strength while still maintaining detail.
November 18th 2016
The moulds are made and the first sample is cast for the Spitfire prototype. The large 12 inch diameter mould for the wing and fuselage casts really well. As you may know we use centrifugal casting where the mould is spun in a casting machine and metal is poured in through the centre. The molten metal is then forced out into the cavities to fill the mould and hopefully form the perfect casting.
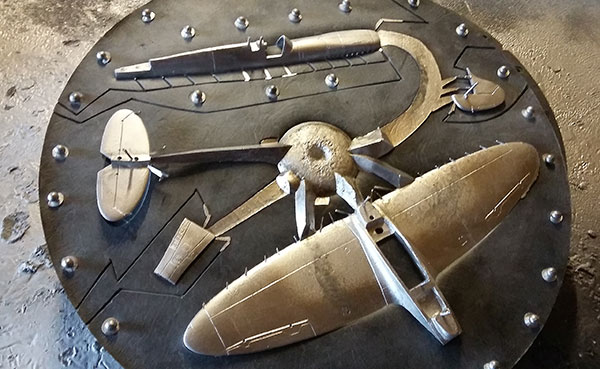
Here you can see a fresh fuselage casting which has yet to be cleaned up. The spiky bits are where metal has crept up the mould air vents. The quality of this casting is fantastic as there is no porosity or visible part line. I think I am finally getting the hang of this after nearly 20 years.
This is the smaller 9 inch diameter parts mould which is cast in exactly the same manner as the larger 12 inch mould. The parts are carefully removed and the remaining metal from the mould is returned to the melting pot for further casting.

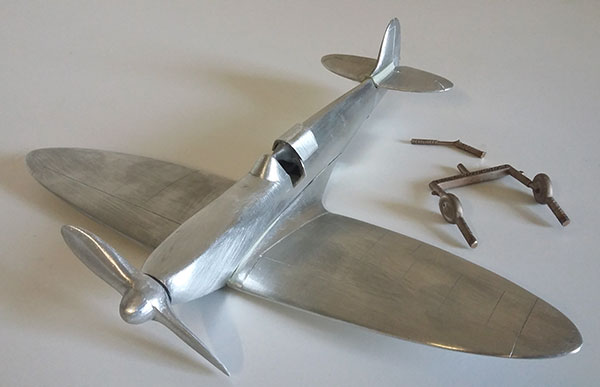
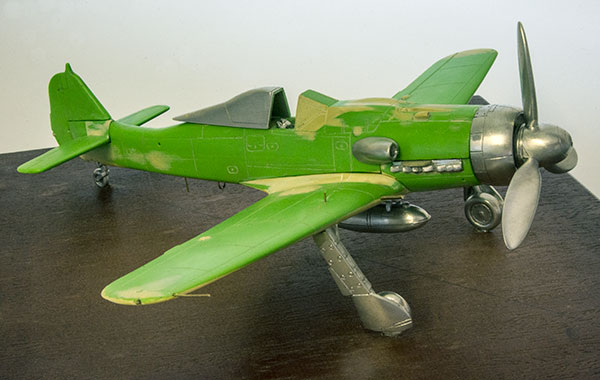
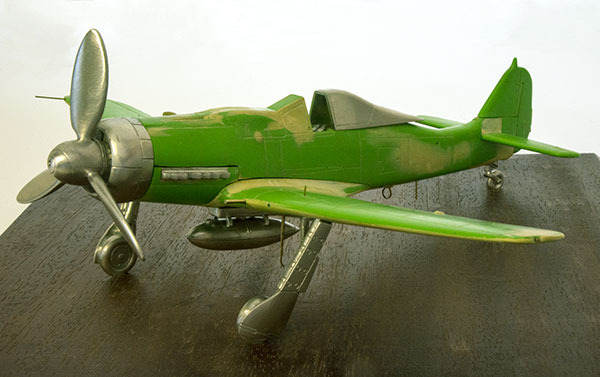
I now have the task of assembling and finishing the first Spitfire prototype as a sample.
November 16th 2016
The master for the Spitfire prototype are almost ready for mouldmaking tomorrow. Just a couple of details to tweak and finish the figures. Everything has to be double checked just to make sure we have got it just right. I have been very careful with source photos as K5054 changed from day to day and finding out at which stage in the development of the aircraft a particular photo was taken can take a bit of detective work.
All looks good with the mockup. The prototype will certainly make a very unusual addition to our range with all its detail differences and a ‘from the workshop finish’. The more I study K5054 the more apparent it becomes that the prototype was almost cobbled together with odd additional dials added in the cockpit. Some photos even show dents in the engine cowling. There is often discussion about the exact specification of prototypes on their maiden flight. For instance the machine gun holes in the leading edge of the wing. The holes were present but no provision had been made for the armament. In fact a pitot tube was fitted in one of the outer holes. Well, I think that’s time for a break and back with fresh eyes for final check tomorrow.
November 11th 2016
Spitfire Prototype sculpting is going very well, the bronze undercarriage has arrived and feels very strong. There are a lot of subtle differences between K5054 and the early Mk Is. As a prototype K5054 evolved throughout its trials and it is often difficult to pinpoint the exact specification when it made its maiden flight on the 5th of March 1936. However there are quite a few photos of the period in the excellent ‘Spitfire The History’ by Key publications. If you like Spitfires this is the ‘bible’.
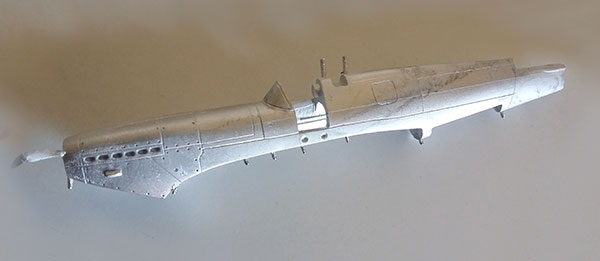
I am making new discoveries all the time which is slowing sculpting down a little as previous assumptions have had to be reconsidered. Initially I had decided to use the Mk I fuselage, but after deciding that to accurately recreate the exhaust setup it would be cleaner to start again I recast the fuselage. The list of parts I can use from our original Mk I is getting smaller by the day, all in the quest for the definative K5054 which I hope to have finished by the end of next week.
November 2nd 2016
I have just started the sculpting the new 1/48 scale Spitfire Prototype K5054. It has been a complicated start as I have had to determine the parts I can modify from existing masters and those I have to start from scratch with. For instance the fuselage will be modified from the Mk I but the wing will be an all new metal master. The photograph below is of the raw wing casting which is always a bit daunting to cast as the results can look pretty ugly.
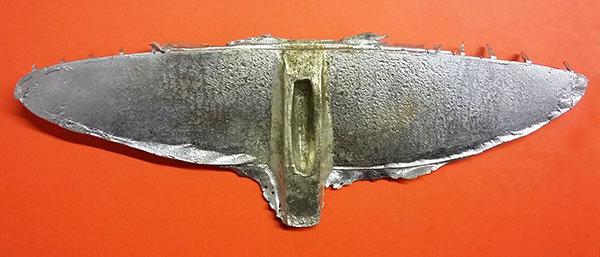
I am actually reasonable happy with this casting. It is oversize so I can accurately cut it down to the exact size and profile of the final Spitfire wing. The surface is fairly rough but after some heavy duty filing it will soon look good. I reckon it should take about 2 days to finish the wing.
New projects are always fascinating and revisiting an earlier subject can often reveal new discoveries. I wanted to find out some more about the two men I will be sculpting with the K5054. R.J. Mitchell of course is a legend in aviation but I knew little about Joseph ‘Mutt’ Summers, the pilot, who flew K5054 on her maiden flight. He is second only to Eric Brown for the number of different types flown (366 vs 487), but holds the record for the number of maiden flights (54). He was given the nickname ‘Mutt’ after his habit of relieving himself on the tailwheel of an aircraft before he took it up. In May 1943 Summers flew a specially adapted Wellington to carry out the bouncing bomb trials. All in all he was quite a man and I look forward to depicting Summers and Mitchell with K5054.
October 17th 2016
The Spitfire Prototype undercarriage is almost finished and is looking good. We could have never produced K5054 as it first flew without bronze undercarriage. The bronze casting and in house decal origination that we have developed over the past year has totally freed us from the previous constraints of what aircraft we can produce. The Spitfire Prototype (and Lightning) show this off perfectly.
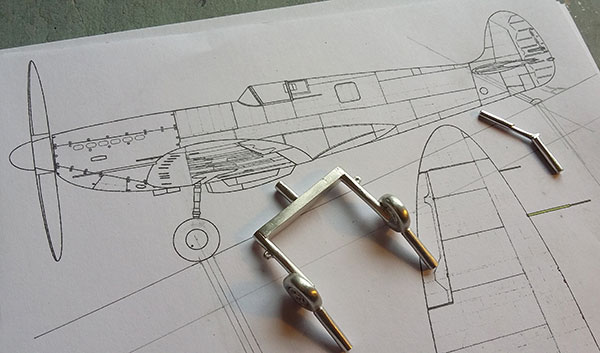
I still have to add the detail to the undercarriage but that should be finished today, then it’s off to the casters.
October 13th 2016
Focke Wulf Fw190D-9 production is going well and I have just taken a quick break to sculpt the undercarriage fo our next release, the Spitfire Prototype. I have to get the undercarriage sculpted first as it has to go off to the bronze casters for mouldmaking and casting which will take a couple of weeks to turn around. Of course it is not only the undercarriage that will be new, pretty much everything has to be re-sculpted (except the seat and joystick). The Spitfire Prototype will be produced as it first flew on March 5th 1936. There has been some confusion over the exact date but it was definately the 5th of March. Accompanying the aircraft will be two new figures, these will be R. J. Mitchell the chief designer of this legendary aircraft and ‘Mutt’ Summers who first flew K5054. Whilst engrossed in some in depth research I found this Youtube video from British Pathe of the Spitfire Prototype and other aircraft at an air display in 1936. Thats all for now… back to the files.
September 23rd 2016
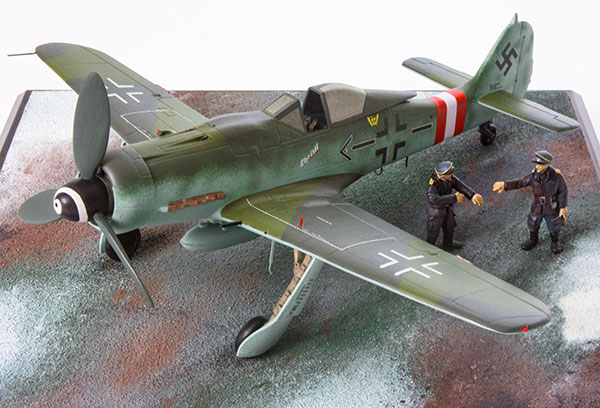
We are now in production with the Focke Wulf Fw190D-9 which has so far been received very well by everyone. The base treatment reflects the harsh European winter of 1944/45 and the two figures are pilots discussing combat strategies. This is our first Fw190 in 1/48 scale and won’t be our last. There are quite a few Fw190 variants and I do know some of you are after a Ta152 as well as the D-9! I have the books, and I am well ahead of the game trust me.
Our next release will be the Spitfire Prototype K5054 in 1/48 scale, as it first flew on the 5th of March 1936. The prototype will be in it’s scheme of aluminium and zinc chromate primer. There are lots of subtle differences between the prototype and the Spitfire Mk I and I will go into those in a later blog post. Developments this year with bronze undercarriage and decal printing mean we can now do the prototype justice and produce a truly accurate model of the Spitfire as it first flew in 1936.
September 16th 2016
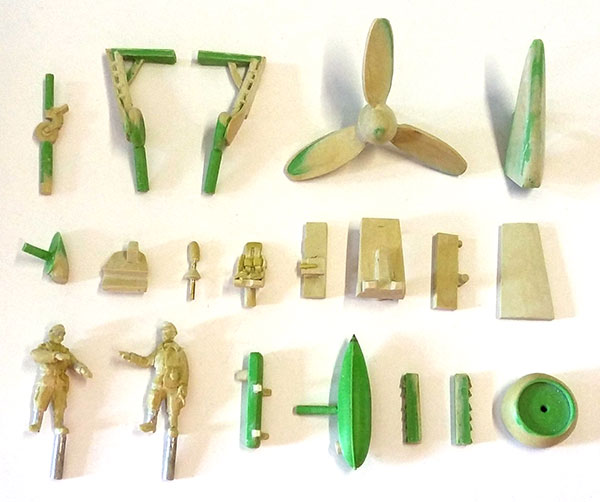
The Focke Wulf Fw190D-9 masters are now finished and I can start mouldmaking on Monday. I love the character of this aircraft, it’s lengthened fuselage gives it a great deal of elegance compared to its ‘A’ series predecessors. All of the parts on the Fw190D-9 were originated on the 3D printer but as you can see several were converted into metal masters using the cold cure silicone mould method I have used in the past.
Of course I have reworked all the parts extensively by hand to get to this stage. The fuselage and wings which remain 3d printed have been painstakingly sanded, filled sanded again and detail added to get to this stage. I have been very fortunate this year to sculpt some really exciting projects and we still have more to come. The Lightning F1A is now SOLD OUT and I still have the Tiger to complete so 2016 will be quite a year for us. 2017 will be a special year for us as well, as it marks our 20th year, how time has flown – sorry for the pun.
If you missed the Lightning don’t worry there will be another but more on that another time.
September 15th 2016
I have managed to create, with the 3d design software, the base on which the Tiger will be displayed. The surface will be sculpted to replicate snow as per the classic photos of Michael Wittmann with his Tiger, and will be mounted on the standard base which we use for our aircraft. The overall base size for the Tiger will be Base size 7.71″ (196 mm) square. This is our number 5 size base.
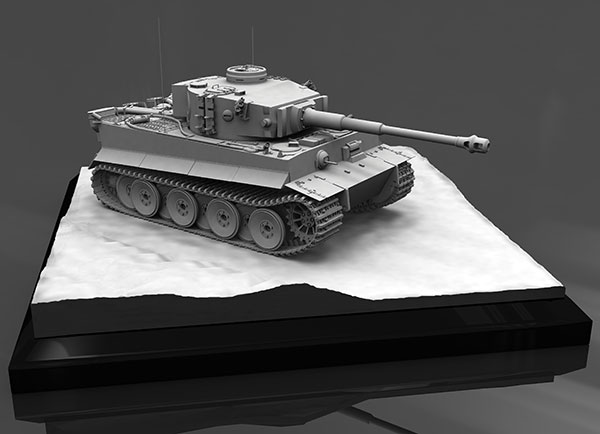
This base will allow room for the tank crew figures which I will be sculpting specifically for the Tiger as an option.
These render views give an idea of the concept I am aiming for. When I produce the base it will have a lot more character and detail than you see here giving plenty of atmosphere to the composition.
September 13th 2016
A very exciting day today! We have just had delivery of our latest bit of technology – a new laser printer, but with a difference. A very big difference.
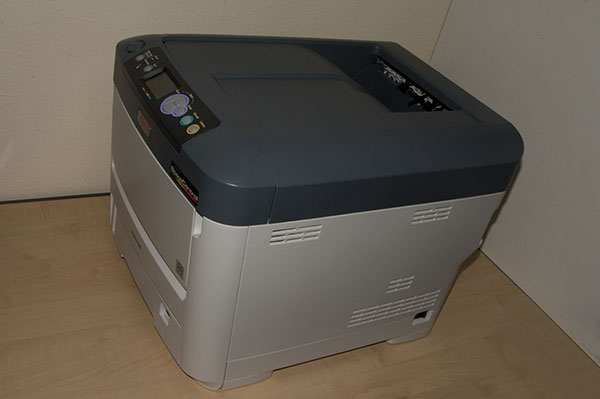
This new very big and heavy piece of equipment can print WHITE. It may not sound much but it is very significant. Inkjet and laser printer normally only print in CMYK (Cyan, Magenta, Yellow and Black) or variants of and rely on the white paper to create the white part of the image. Having a printer that prints white allows us to print all our own decals giving an infinite variety of colours allowing us to produce more elaborate aircraft schemes. The process requires special papers and a heat press, and I will have to learn some new techniques but thanks to a really good tutorial from our supplier I am convinced we can get some excellent results. It has all been a lot to take in today and my head is now buzzing with ideas so I think I will have a lie down for a while.
September 11th 2016
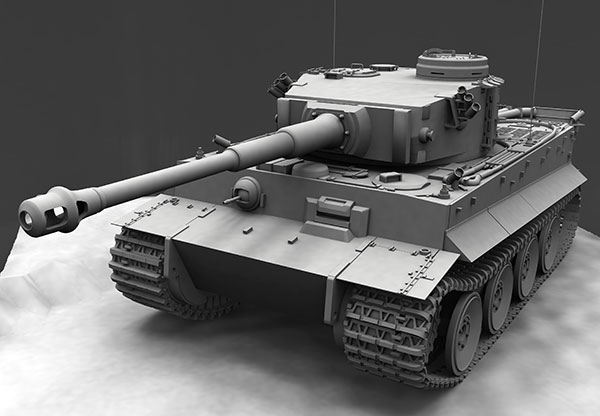
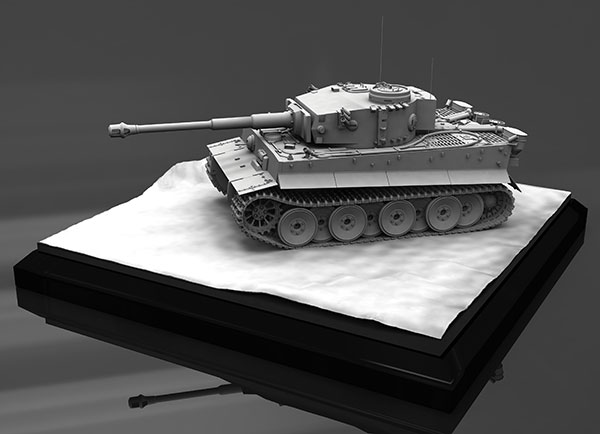
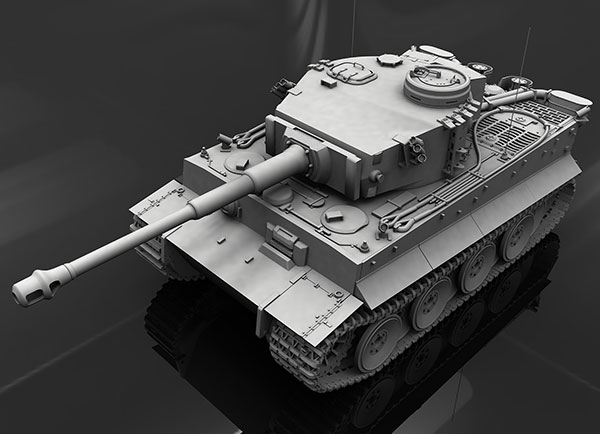
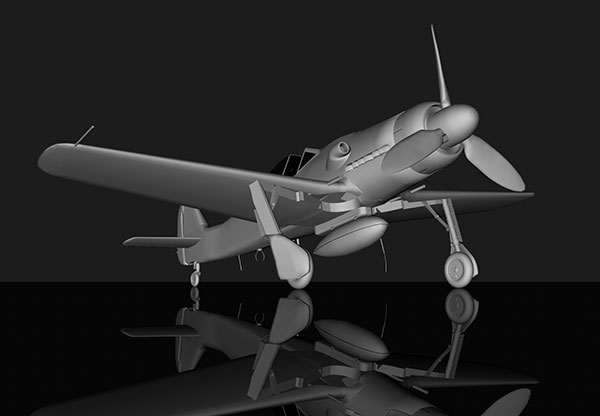
I have reached a significant stage in the design of the new Tiger I tank. I have just completed the computer modelling stage of the Tiger. This means I can now print all the parts on the 3D printer although I am well advanced with this stage as well. The images below are computer generated images based on my computer model and are known as ‘renders’. I thought you would like to see the level of detail I am aiming for and how well the character of the Tiger has been captured. The Tiger is a complex subject as the tank evolved throughout its production. Fortunately Wittmann’s Tiger is well enough documented to ensure I can sculpt it accurately.
In the first overall image you can see the character of the Tiger and how detailed the upper hull and track units are modelled.
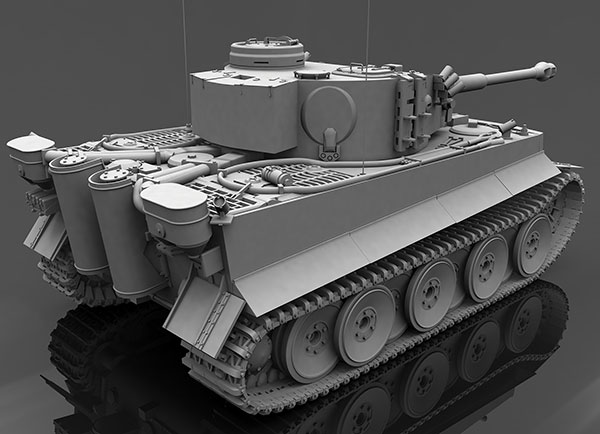
The second render shows the rear 3/4 and gives a good sense of the bulk of the Tiger. Of course the rear of the Tiger is also well detailed with the toolbox exhausts and jack.
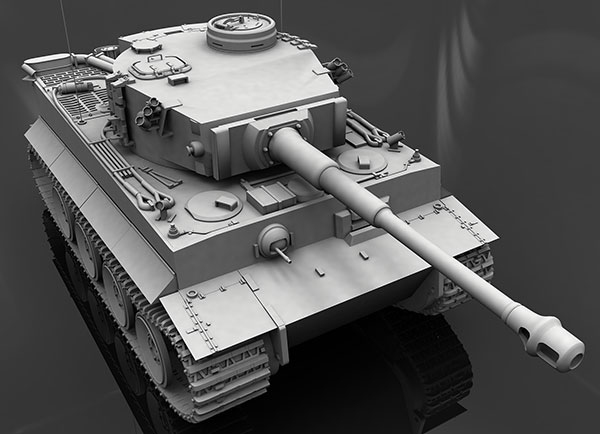
The final render really captures the Tiger and shows what a formidable weapon this tank was in its day, feared by the allies until it eventually became outgunned.
I now have to complete the printing of the parts on the 3D printer before reworking them for mouldmaking.
September 10th 2016
Right now we have a lot of projects going on; launching a new range (tanks), sculpting a new 1/48 aircraft (Fw190D-9), production, and new websites. On top of this we have some exciting new technology coming next week which will give us more flexibility within our aircraft range and allow us to develop another exciting new range so make sure you check back in later next week for my blog updates. I also hope to have finished sculpting the Fw190D-9 by then which I am really pleased with.
In the mean time there have been exciting tank developments so make sure you visit my tank blog for the latest news. I have also begun adding Facebook, Twitter and Instagram links across all our sites to make our social media more accessible. We use Facebook to post all our aircraft, tank and progress photos, Twitter to post all our aviation and history news, and Instagram to quickly post my latest progress. If you are on any of these try following us – you might like it. If you aren’t it’s quite straight forward to set up and we don’t access anyones details so it is safe, just click on the relevant logo which will take you straight there. That’s about it for now back to herding cats…… Winston!
August 23rd 2016
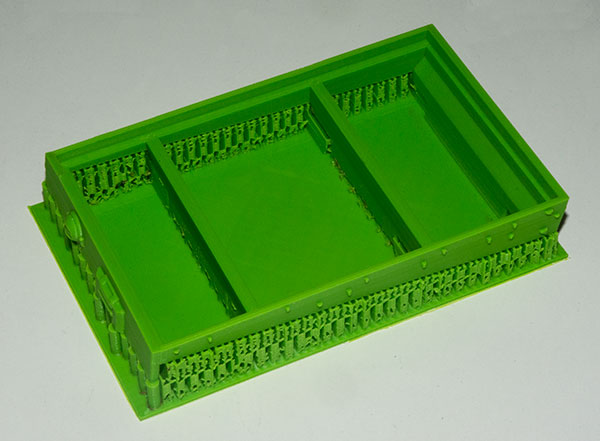
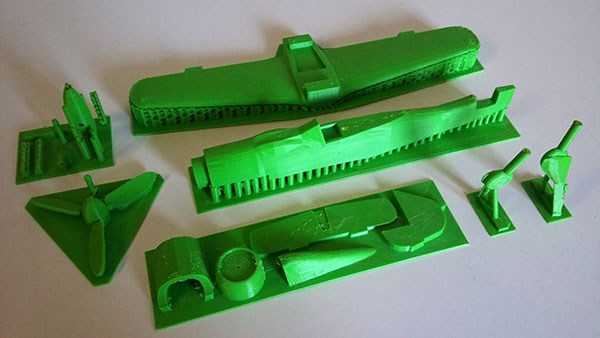
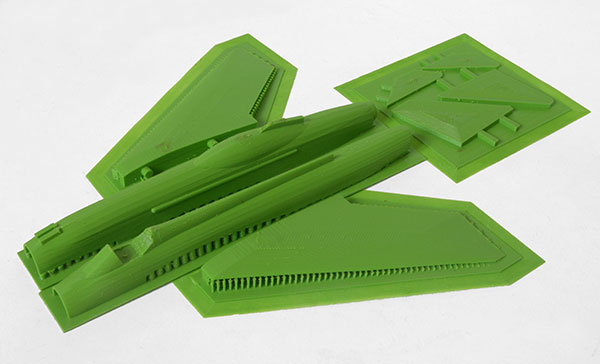
Design and origination of our first pewter tank has been going very well over the past few months. As you will have seen from our production section the Tiger I has been designed using Computer Aided Design (CAD) software, and is being 3D printed. The image bellow is of the upper hull with the machine gun position and driver’s view port on the left hand side. This part is exactly how the part comes off the printer with no cleaning up. The honeycomb areas at the base are created to allow the printer to create the overhangs required and will be removed as will the flat base section. This part of the upper hull took about 9 hours to print and is the 4th attempt.
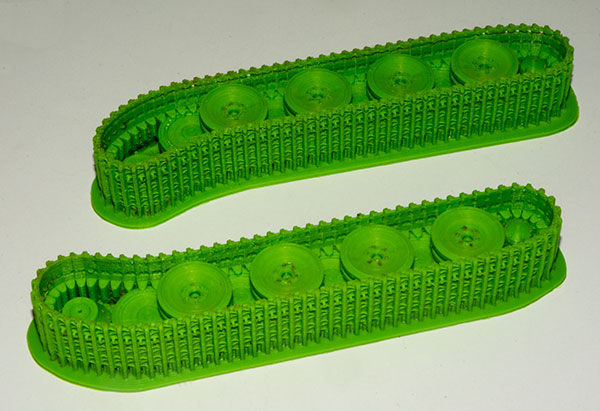
One of the key parts of a tank that I was most concerned about printing was the wheel and track unit. After many experimental prints this is the final result. Each of these parts took 39 hours to print, but the result was well worth the wait. The level of detail is fantastic. Each track link is finely detailed as are the road wheels and idler. These parts still have to be removed from their base and support material and cleaned up by hand. The outer road wheels and drive sprocket are separate and yet to be printed.
I mentioned that the upper hull was the 4th atempt, well I have learnt a few things chiefly regarding the feed of the plastic into the 3D printer which will cause the print to fail if it is restricted in any way. The temperature surrounding the printer is also important as any drafts can cause the part to come away from the platform. Unfortunately we have also had 2 power cuts, causing the printer to shut down, thankfully not during the track prints. I will be investing in an Uninterupable Power Supply (UPS) shortly to allow the printer to continue if we lose power again.
August 22nd 2016
A quick progress update on the Fw190D-9. Most of the parts are now fitted together and I can begin my favourite stage, adding the detail. I have already started with the tail and will now work on the fuselage before getting stuck into the wings. This detail stage seems to go very quickly except for the undercarriage which always takes a long time to get just right. The proportions of the Fw190D-9 are wonderful, it is such an elegant fighter and I am really enjoying the project.
As promised the link to www.pewtertanks.com has been added to all the pages on both our Diverse-Images and Pewteraircraft websites.
I have also just updated the pewtertanks blog with some 3D printing I am particularly proud of.
August 17th 2016
We are pleased to announce our new website www.pewtertanks.com is now live. This site contains our new range of tanks, starting with the Tiger I of the famous ace Michael Wittmann. All our tanks will be in 1:48 sacle and mounted on a base in the same style as our pewter aircraft and have the option of additional figures. I am currently targeting a release date for the new Tiger around December but you can keep up to date with the latest developments via the new ‘Sera’s tank blog’ I have set up on the site. The blog is set up in the same style as the aircraft blog.
Over the next week or so I shall be adding a new button to the pewteraircraft and diverse-images navigation panels with a link to the new pewtertanks website. I hope you enjoy the new site and If you have any questions or have any ideas for future tank subjects please send me an email. For some time now we have been looking at techniques that would allow us to produce similarly accurate tank models, Until recently all our aicraft had been exclusively sculpted by hand. With the development of Computer Aided Design and 3D printing we are able to produce high quality masters that after careful hand finishing and mouldmaking result in excellent collectables.
We carefully considered what sacle to produce our tanks in and determined that 1:48 scale would be perfect as it would give us the best level of detail and would compliment our pewter aircraft range. Like our aircraft range our tanks will come mounted on a base replicating the theatre of operations. However our tank bases will have much more relief as they will be sculpted and cast in resin. Collectors will also have the option of adding figures, specific to each tank, as with our aircraft.
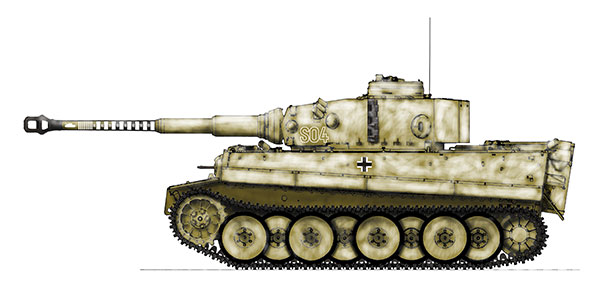
Below you can see our concept profile for the new Tiger I. The profile is a working drawing and as such the production model may vary from the drawing as the subject is explored in greater detail. We chose the Tiger I as our launch model as it will be the best tank for the collector to judge the quality of our new range. Those of you that know our aircraft range will be aware that we not only produce the classics but have a reputation for producing subjects other manufacturers will not touch. So you can expect to see a very wide variety of tank releases over the next few years.
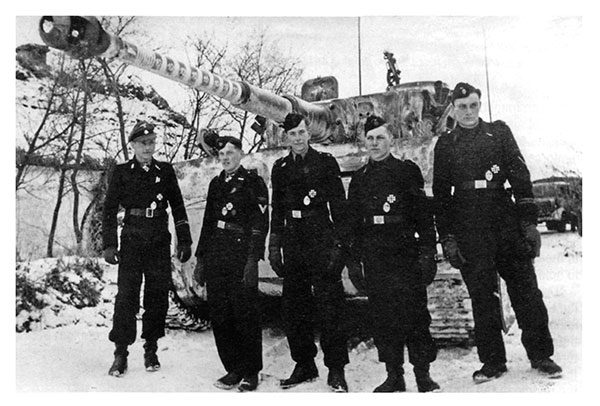
We always work from source photographs and in choosing the most famous Tiger I of them all we can be sure to produce an accurate model. This photograph is one of a sequence taken of the famous ace Michael Wittmann and his crew in front of his Tiger I ‘S04’ in the winter of 1944.
At Sera’s Blog I will keep you as up to date as possible with tank progress. Many enjoy reading my pewter aircraft blog and this will be in the same vein.
Below is a computer generated image (render) of a Tiger I track and wheel unit which I have created ready for 3D printing. This is the most complicated part on any tank and only after successfully 3D printing it could we greenlight the whole tank project.
You can imagine it was a massive relief to achieve a print of sufficient quality (pictures to follow). Of course I still have a lot more to do – more on that next time. You can see more of our design and manufacturing techniques in the ‘Production’ section of the website.
August 11th 2016
Fw190D-9 sculpting is going well all the 3d printed parts for silicone mouldmaking have been cleaned up and Milliputed. Also several new parts have been created in Milliput along with the two new figures. All these parts will be modified once they have been translated into metal masters.
The Milliput/ 3D masters have taen a bit longer than usual as there has been a lot going on. Sometimes I think it is like ‘herding cats’ although, Winston has been very well behaved recently. I hope to make a pretty big announcement soon so keep checking in. Ok! back to mouldmaking.
August 2nd 2016
I am now finally up to date with orders and have been very busy co-ordinating various other projects. I have originated undercarriage for the Piper Cherokee from our ‘Light Aircraft range’ without spats. These will be cast in bronze. Many UK light aircraft do not have spats as they operate from grass runways. I will soon be setting up a separate website for tanks, the first of which I have been 3D printing with amazing results ( more on that later ). At last I am now working on the Fw190D-9. As you can see I have removed the prints from the support material and started to clean them up and fit them together.
Some of the parts will remain in the 3D printed material others will be converted into metal and a few will have to be originated in Milliput before also being converted into metal. This stage does get a bit complicated and confusing as I have to carefully plan the correct breakdown of parts to ensure maximum detail for minimum assembly time. The Fw190D-9 will have separate 23 cast parts and 2 new figures both of which will be pilots.
July 21st 2016
As some of you may be aware (via Tim’s email newsletter) that I am in my spare time working on several other projects. These include flying boats, biplanes and tanks. Some of you may also remember I said we wouldn’t be producing tanks (March 3rd 2014), well a lot has happened since then. They say a week is a long time in politics, it certainly has been recently, since March 2014 I have learned a lot about computer modelling and 3D printing. I still have a very long way to go but our new technology has allowed me to develop new techniques to now say that we will be producing a range of tanks to compliment our aircraft. I have also worked out new techniques for producing flying boats (our first is already printed) and I think I have solved most of the issues that have lead to us avoiding biplanes. We can cast the undercarriage in bronze and I am working on a new rigging system. I still have a way to go on these projects so please be patient and bare with me. As soon as I can I shall let you know more of the detail.
July 14th 2016
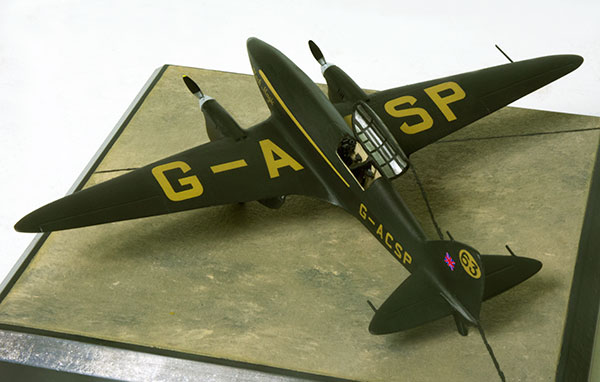
Our new tech is certainly making itself useful. The flexibility of being able to print our own decals has allowed us to release an aircraft I have wanted to produce for a long time. We already make a model of D.H. 88 Comet ‘Grosvenor House’ but one of the sister aircraft ‘Black Magic’ has always been a favourite of mine. It is an aircraft with a fascinating history and the perfect companion to ‘Grosvenor House’. ‘ Black Magic’ was flown by Jim and Amy Mollison (nee Johnson – yes, Amy Johnson) and was rediscovered in a Portuguese farm before being shipped back to England where she is now being restored to flying condition. For more details on the restoration project visit www.cometracer.co.uk. At present you can find the Comets in our ‘Other Air Forces’ section, but as we add more civil aircraft I hope to create a new section dedicated to civil aircraft of all types.
July 2nd 2016
Still making Lightnings! This has been a very popular model for us and the feedback we have had from our customers has been wonderful. It is always very rewarding when I produce an aircraft that you appreciate so much. Thank you to everyone for patiently waiting for your aircraft to arrive. I am almost up to date and we are almost sold out.
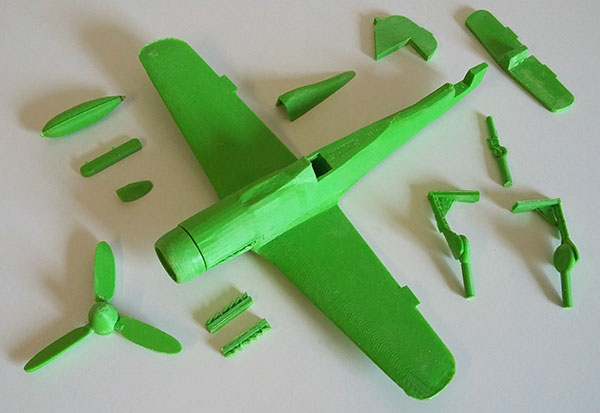
Of course we have also had customers champing at the bit for the new Fw190D-9 and I can tell you I have 3D printed most of the parts (just the cockpit to go). I hope to get back to sculpting in the next couple of weeks. In the meantime here is a photo of the parts so far.
June 17th 2016
I have recently been hard at work producing Lightnings (a lot of Lightnings) and it made me think that the Lightning totally sums up the style of our range of aircraft. Here’s what I mean, we have never taken other peoples information at face value (see April 28th post), we go the extra mile with detail and accuracy, and we mount our aircraft on a base for good reason. The following pictures should show this clearly.
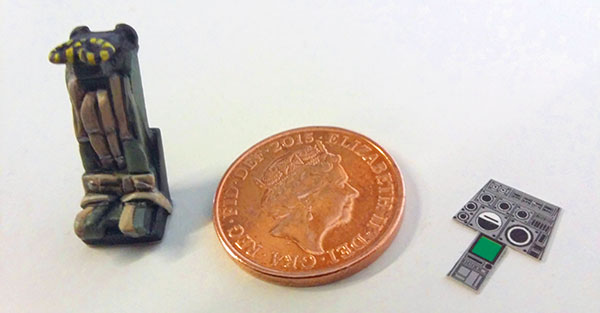
The Lightning seat and instrument panel next to a 1p coin (about the same size as a US 1 cent). The ejector seat is hand painted and only 2 cm tall, the instrument panel is a decal printed by us and is the finest we have yet produced. The resolution is stunning and I really look forward to pushing the printer to the limit.
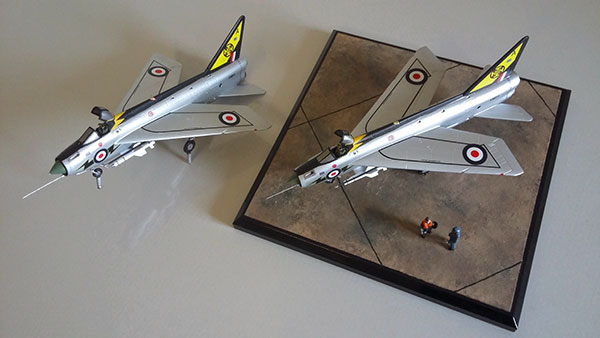
Why do we mount our aircraft on bases? Well, the Lightning having a tricycle undercarriage shows us one reason straight away. If we didn’t mount the aircraft on a base it would sit on it’s tail (hardly realistic). Mounting on a base and using our packaging system to grip the base with the box means nothing touches the aircraft. This allows us to add fine detail such as aerials, missiles, and pitots without damaging the model in transit. Of course the base is another entity in itself and we always consider a realistic context for the aircraft. The addition of figures only add more to the model giving atmosphere and scale.
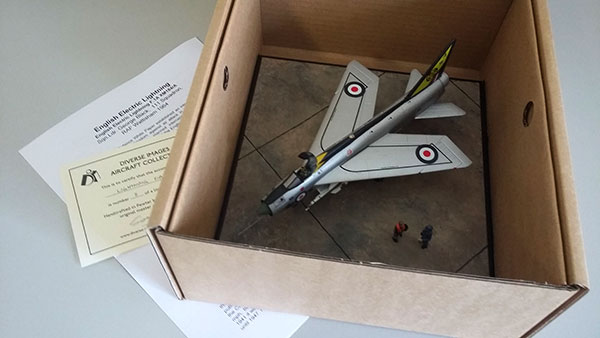
An additional insert further secures the aircraft in the box which is topped off with a signed certificate and aircraft history. The Lightning is finally ready for dispatch.
June 4th 2016
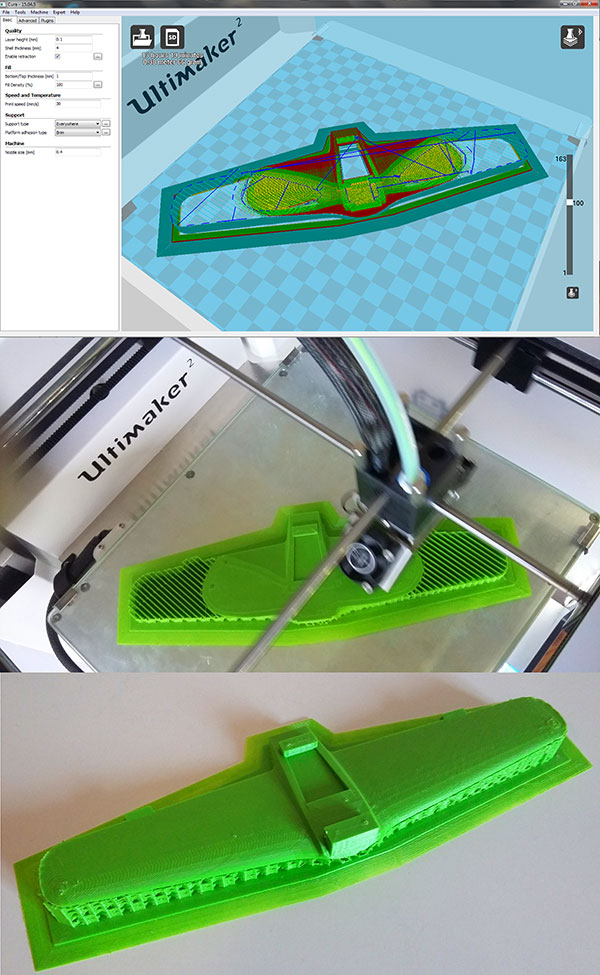
This week I have been fully on Lightning production but my latest employee, the 3D printer, has been busy on the Fw190D-9 project. I had created most of the parts already in the computer but just had to print them out. The following photos give an idea of how the proccess works. The first image is from the computer using some ‘slicer’ software to prepare the wing for the printer. The green in the image is the layer being printed, the red is the edge of the printed layers and the blue lines represent the path of the printer. The second photo shows the wing on the printer at roughly the same stage. The striped lines are the support material being printed under the wing. Finally 14 hours later I have a finished wing and you can see just behind the leading edge the lines of the different layers as they were printed. Now I just have to print all the other parts.
May 31st 2016
As you may know I have been trying to resolve some casting issues through careful design on our latest project the Lightning. One of the biggest problems I have had with casting is the metal shrinking as it cools. Here is an explanation of what I have been trying to overcome. Our first image shows a typical fuselage casting where we feed the metal into the nose of the aircraft. The metal then flows along the fuselage to the tail where it begins to fill the mould.
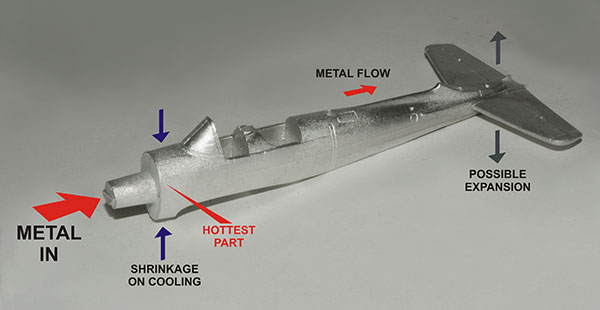
The force of the metal at the tail end can cause the mould to expand at this end and the resulting casting to be thicker than desired, or in extreme cases, the metal to spray out of the mould or ‘flash’. Also if you remember your school physics metal expands on heating and shrinks on cooling, so up at the nose end which is the hottest part where all the metal enters we can get shrinkage on cooling. We use this method on most fuselages, which naturally allow themselves to be fed in the nose. On the Lightning I fed the fuselage in the middle as both ends have thin walls (Jet intake and exhaust).
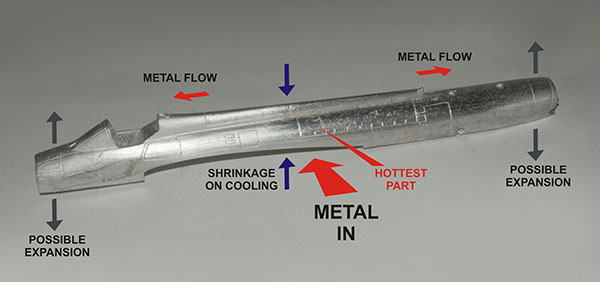
Here the same principles apply regarding heat, flow, expansion, and cooling. We use this method to cast our wings as it heps to get the metal to flow into the thin trailing edges. It would seem this is all a real nightmare to balance but with good design and careful casting we actually get very little shrinkage and no expansion. For instance if we were to get the mould too hot we would get ‘porosity’ at the hottest point where the metal would shrink so much on cooling that the surface would become coarse. Fortunately we do not get shrinkage along the length or width of the casting this means our aircraft are always as dimensionally accurate as the masters. The amount of shrinkage on cooling is actually very small, and is even less the cooler I cast. It is not even noticable on the finished model but does affect how well the parts fit together. Any gaps that are present are carefully filled and filed back to make a pristine aircraft. With the Lightning being a bigger aircraft than normal I tried some new techniques to minimize the shrinkage fit issues and I seem to have been pretty successful. I can now use these ideas on our future projects.
May 28th 2016
Firstly thanks for the suggestions from everyone re ‘Cold War’ projects please keep them coming. Let it not be said that we are not open to fresh ideas. We have already reassessed our release program after being stunned with the reaction to the Lightning, and are begining to make plans for future releases. There has been a lot of bedtime reading I can assure you, and I hope we can make some announcements after the Fw 190D-9. Talking of the Fw190D-9 here is a quick status report.
So far the Fw190D-9 has been designed on the computer using the 3D modelling software and has been ‘cut up’ into ist component parts for 3D printing. However based on the Lightning casting and assembly I have to do some tweaking. Casting large items (fuselages mainly) can cause problems with shrinkage and expansion of the castings which means a lot of time spent during assembly to fit the parts and fill any gaps. While I was fairly successful on the Lightning I have understood more of what goes on with the metal as it goes into the mould and how it cools. I hope to expand more on this in a blog post soon. In the meantime I must interpret what I have learned on the Lightning and apply it to the Fw 190D-9. I thought you might like this ‘render’ of the 3D model while I am making my adjustments for printing.
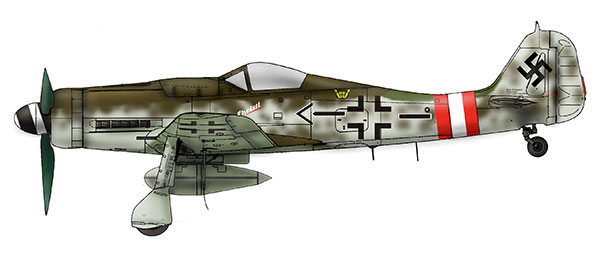
The Fw190D-9 is an imposing beast and I think one of the best looking Luftwaffe aircraft of the Second World War. We will of course be offering it with two new figures, one of which will be Barkhorn, maybe with another pilot?
May 24th 2016
The Lightning is finally in production and I am now a totally converted Lightning fan. This model has so much presence it is definately the ‘Cold War’ Spitfire. I am really pleased with the way the scheme came out, the silver is perfect, and the decals look stunning. The levels of detail in the cockpit and undercarriage are fantastic.
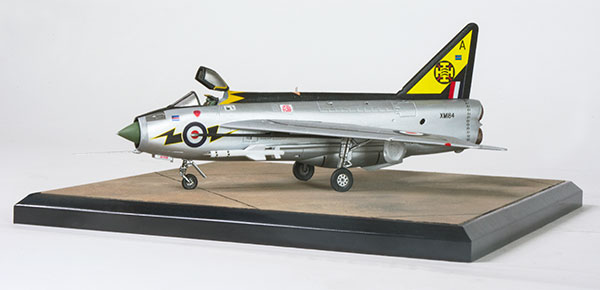
Of course the new model has the option of two new figures being the pilot and an officer. The Lightning is modelled with the gun ports open and with the protective covers removed on the Firestreak missiles making this interceptor ready for action. The refueling probe came out perfectly and encourages me to reconsider other aircraft with fragile undercarriage for the future. I have learned so much during this project, picked up some new techniques, and improved on some existing ones. Having produced such a satisfying model I am now looking at other ‘Cold War’ projects – any suggestions?
May 13th 2016
As promised some Lightning progress photos. It has been a tough week; mold making, casting, fitting, detailing, and I am still not finished. At least on Monday I should be mould making. All of the parts are fitted and most of the detail is there, just the cockpit to go. The first photo is a composite of this week’s progress.
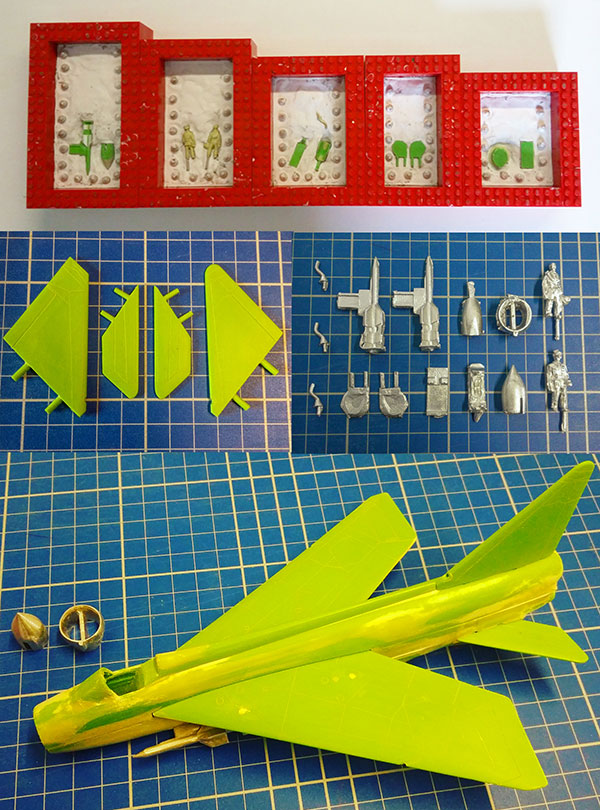
It took me an age to clean up the Firestreaks, they are massive in real life and were built by de Havilland. Whereas I used to cast a blank for parts such as the horizontal and vertical tails these are now 3d printed as blanks and much quicker to file to shape being plastic. At this stage the fuselage to wing fit is looking very good and I have been working on the intake. There are quite a few complex design issues with the intake which I shall explain in a later post.
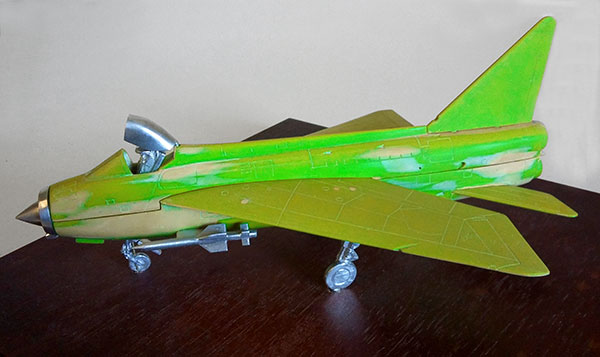
Of course this is the photo you have all been waiting to see. I am really pleased with the result. For the photo I still have to finish the cockpit and the undercarriage are just rough castings as the finished masters are off at the bronze casters with the refuelling probe. Pitot and aerials are still to fit, and I still have to make final checks for additional detail. Well thats me finished for the week, have a great weekend everyone.
May 10th 2016
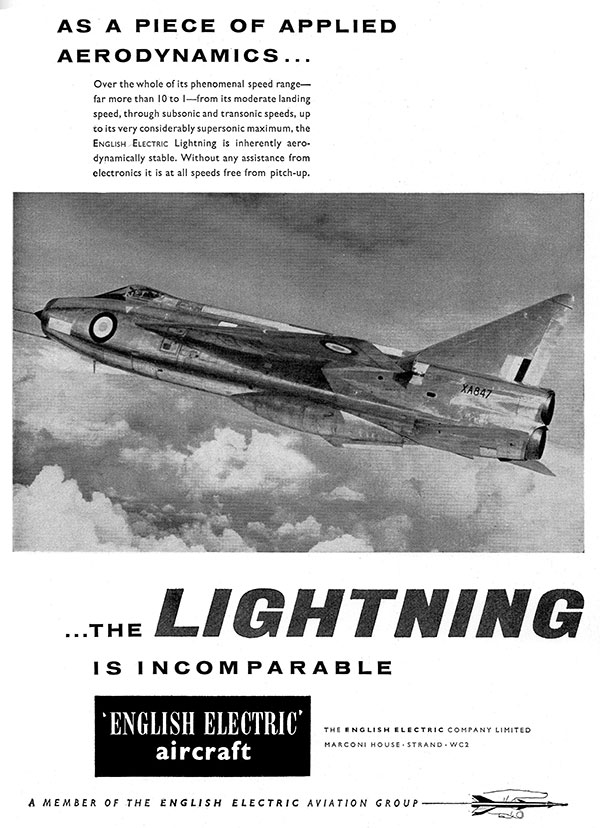
How about this ‘blast from the past’. From back in the day when the aviation industry advertised in mainstream magazines. This advert is from ‘The Aeroplane’ magazine February 1959. To be honest I never saw the appeal of the Lightning, finding it ugly, but thats not the point of an aircraft like this – to win beauty contests. Since we decided to release it I have grown to really like it. The Lightning is totally uncomprimising and just screams supersonic interceptor. I don’t know what it is but this beast is becoming a favourite. I can’t wait to get all the parts together and post a photo. Today I finally cast the last parts from the silicone moulds so I hope to finish the masters by the end of the week.
May 7th 2016
This week has been a bit complex. Lightning progress is excellent, I have had to sculpt the undercarriage first so theat we can get the metal masters off to the bronze casters. However, I have to get the rest of the aircraft sculpted to a point where I can fit the undercarriage and check the various heights of the aircraft as it sits on its base. Fortunately because a lot of the geometry was set up during the computer 3D design stage things have gone very well.
I haven’t had time to do a propper blog post until now but heave been making use of instagram and my new phone to post pictures which has worked very well. Instagram is ideal for this, I thoroughly recomend it, all you have to do is download the app on your smartphone and follow us at ‘diverse_images’. You can even ask me questions about my postings. Here are some of the photos I have posted this week.
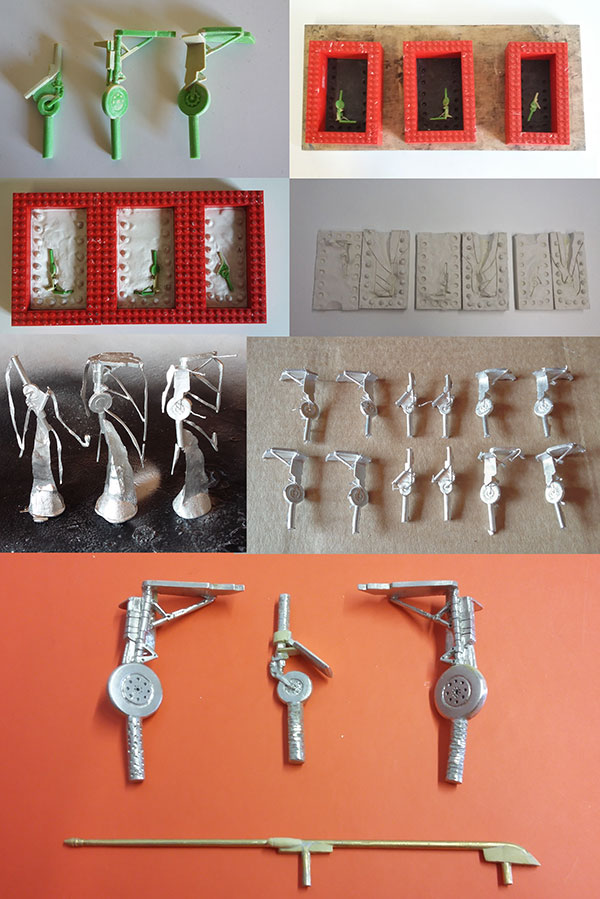
As you can see they are mainly about the undercarriage sculpting with the finished masters being in the final photo together with the in flight refueling probe which I sculpted from sections of brass rod and Miliput.
I now have to finish the masters for the other small parts and make silicone moulds for them so that they can also be translated into metal. I have another set of roughly cleaned up undercarriage and hope to post some images of the Lightning in its full glory next week. So far it does look very imposing it is a very large aircraft, I have to keep checking the scale to convince myself it is correct – of course it is spot on.
I am trying several new techniques on the Lightning which so far look to be working out well. I have learnt to try and have a contingency in case things don’t go entirely to plan but I think I have most of the bases covered. More on that later.
April 28th 2016
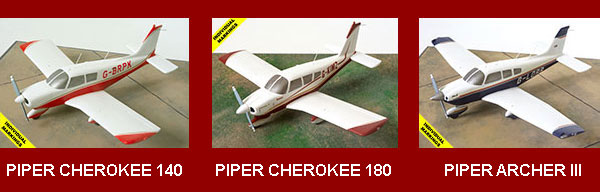
A ‘Big Blog Day’ today! Firstly we can now add three more 1/48 scale aircraft to our ‘Light Aircraft Range’ these are as follows;
These, like all our light aircraft, are available in individual markings. So if you own or have special memories of a light aircraft you flew give us a call.
Of course this all means I can get started on our Lightning project. You will have seen from my earlier posts that we have already 3D printed most of the parts so I am fairly well advanced and have been champing at the bit to get going.
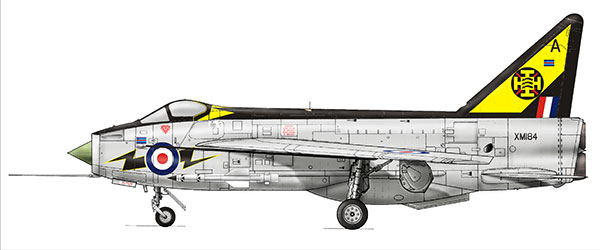
We are often asked ‘How do you choose an aircraft?’. Some aircraft have a great history ( Piper Grasshopper L-4H), some are technically significant (Fairey Hendon), others fill a gap in our range (Mosquito NF II). Naturally producing ‘A’ Lightning is a no-brainer but which Mark to pick? I opted for the Mk I as it would be the least complex to produce, and an all silver scheme would make a dramatic release. I chose XM184 as it had been well documented and being a Mk 1 wouldn’t have an inflight refueling probe, which would be a problem to sculpt and cast. The colour scheme for XM184 is of course striking and being the CO’s aircraft unusually has penants on the tail and nose. There have been many profile drawings of this aircraft so I assumed all would be straight forward – wrong! We always try and back up sources with photographs as confirmation. After a quick Google all seemed ok, but on close examination of the photos I noticed something eveyone else had missed and that shouldn’t be there – an in flight refueling probe. After I had calmed down and I found other photos confirming the probe. XM184 does seem to be quite extraordinary being the only Mk 1 I can find with a probe. Here is one of the photos ( which I am unable to attribute) clearly showing the infamous probe. it is still a splendid beast.
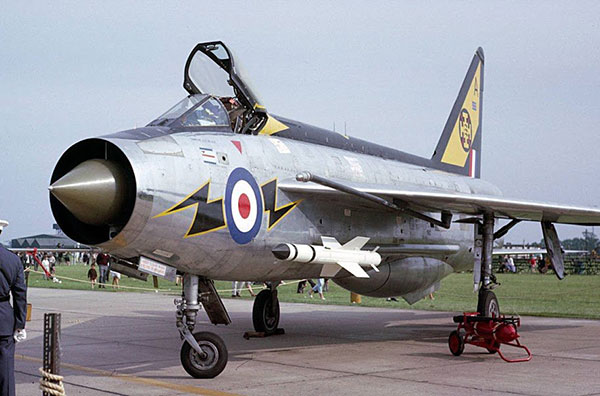
We also have a photo of XM184 being taxied and the pilot wearing a black helmet. Presumably this is the CO Sqn Ldr George Black, so one of the optional figures will be a pilot with a black helmet. Now you know how we choose aircraft and why we never rely on profile drawings – they can often be wrong. By the way I am planning to get the probe cast with the undercarriage in bronze.
April 1st 2016
Just a quick post to show you our latest light aircraft developments. We are about to release the Piper Cherokee in 1/48 scale. The Cherokee is one of the early variants from the Piper PA-28 family of aircraft, from which we have already released the Piper Archer II. I hope with the release of the Cherokee which has the earlier ‘Hershey Bar’ wing, narrow tail, early style nacelle, undercarriage spats, and vertical tail that we will be able to offer most of the PA-28 variants. I still have to carry out some further research but so far things are looking good.
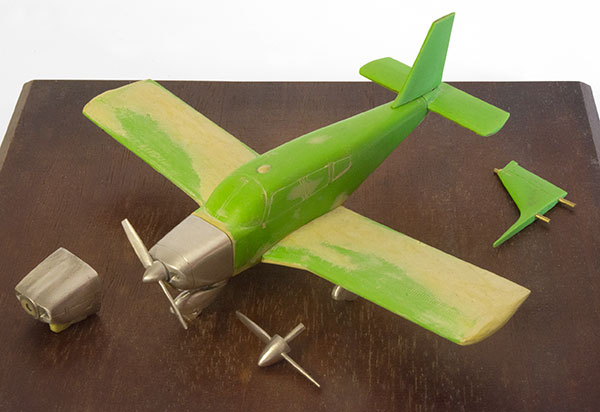
It can be very complicated sculpting an aircraft with so many variants but once I get going and identify where the changes are it eventually becomes a lot clearer. I hope to finish the Cherokee masters early next week, then it’s mouldmaking and samples.
Have a good weekend and I hope you survived April 1st unscathed.
March 24th 2016
I am now pretty much up to date with production and taking a break for sculpting. While I have been getting out orders to customers the 3D printer has been very busy. It is very much like having an extra pair of hands, beavering away for hours at a time. I thought you would like to see what has been printed so far on the Lightning project. Some of you may have seen some of the parts on Instagram where I can post images more quickly. So far the printed parts are as follows; the fuselage printed as upper and lower halves, the wings are separate as are the tails. Of course as you know I have already printed the undercarriage. These large parts have their own problems such as warping due to the heat, which can cause a print to curl up at the ends – not good! The fuselage halves took about 8 hours each to print, and the wings about 5 hours each.
I still have a few parts to print, but so far so good. Once everything has been printed I can remove the parts from their supports and begin cleaning up and fitting. As with the metal masters I prefer to produce a ‘blank’ shape in many cases (tails) and then file the part down. Obviously it is a lot quicker to file down plastic than pewter. I deliberately don’t print any detail, just the shape of these parts, as all the fine detail will be added by hand. The more aircraft I produce using the printer the more confident I get about taking on other projects for the future. It is all very exciting.
I stumbled across this video on Youtube which shows some very clever people 3d printing an aircraft using the same printer as ours. This just shows you what the pros can do!
March 4th 2016
We can now announce one of our most eagerly awaited aircraft the English Electric Lightning F Mk 1A. Sculpted in 1/72 scale, the aircraft we have chosen was flown by 111 Squadron and bares its striking tail and nose art.
As you will have seen from my January 5th post we are well advanced with the project and I hope this weekend to separate the parts in the 3D program and prepare them for 3D printing over the next couple of weeks.
I have counted up the total number of settings ot the 3D printer and software which allow me to create a good print. It is a surprising 61 – lots to adjust and learn how to get the best out of the printer.
Talking of printers I am also making very good progress printing our own decals. The Lightning will be one of our first aircraft where all the decals will be produced ‘in house’ . The resolution achievable with our new printer is phenomenal so I am really looking forward to seeing the results on the Lightning.
Also I have my PC back, now with a new SSD hard disk and a few more GB of RAM, and boy is it fast – dare I say it is ‘Lightning Quick’ . Sorry about that, have a good weekend.
March 2nd 2016
As I mentioned in my last post I have the ‘Olsson block’ fitted to the 3D printer which allows me to fit different sized nozzles and print finer detail. I had hoped to fit the block over Christmas but I was wary of damaging a sensor so ordered a spare, which of course I didn’t need – typical. The prime reason for the ‘Olsson block’ is to allow me to fit a smaller nozzle to print detailed parts such as undercarriage. The first photo below is of a series of prints of the Lightning undercarriage with the standard 0.4mm nozzle and with the thinnest layer height of 0.06mm. All I can say about them is they did get better but still not good enough.
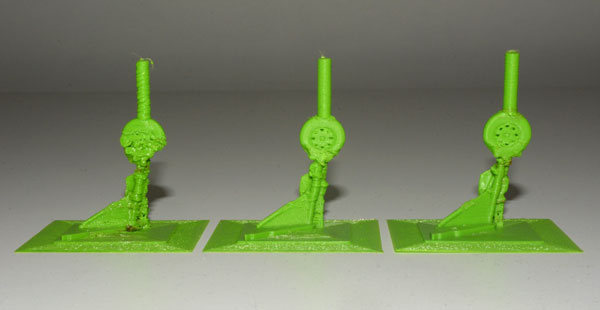
The second photo is of a set of undercarriage, again for the Lightning, but printed with a 0.25mm nozzle – a big improvement. I still have some cleaning up to do but the level of detail is fantastic. A 0.15mm nozzle is available but only recommended for experts, with the 0.25mm the plastic comes out incredibly fine anyway.
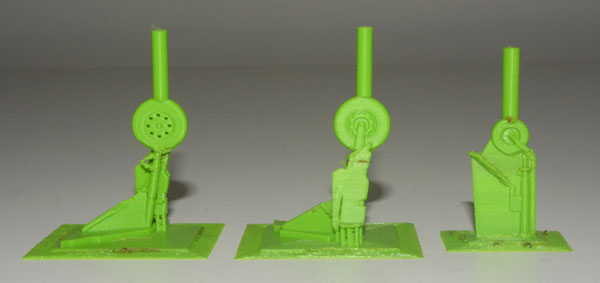
There is a fair bit of support material to remove and, I do need to Milliput a few bits but these will eventually be cast in bronze giving incredible strength and detail to the undercarriage. Unfortunately I can’t yet show you a profile of the Lightning as my main PC has decided to expire. I am writing this on my backup laptop which doesn’t like graphics very much. We are very data and security conscious, and I have everything backed up so no loss of data.
February 19th 2016
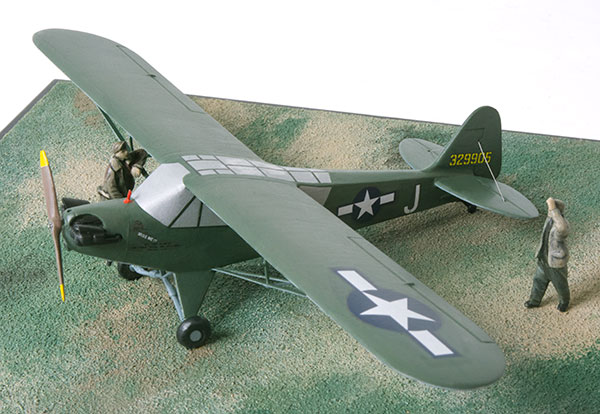
I am now up to date with Mosquito production but some of you may have noticed the latest addition to our range. We have sneaked in a Piper L-4H Grasshopper in 1:48 scale. This is a limited edition of 25 only and is also available in individual markings (at an additional cost). The Pipier L-4H is a military version of the Piper J-3 Cub (see our light aircraft range). The particular aircraft we have chosen was called “MISS ME!?” and was flown by Lietenants Duane Francies & William Martin. In a famous incident the two Lieutenants shot down o Fieseler Storch with their Colt .45 pistols, this was the last aircraft shot down by an Allied aircraft in the European theatre in World War II.
January 14th 2016
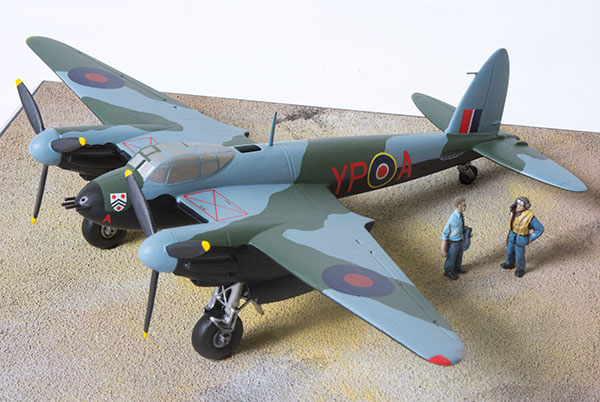
Our new Mosquito NF MK II is now in production and I am really pleased with the result. There are lots of oddities with this aircraft. For instance the black (RAF designation ‘Night’) underside was not applied in the factory but ‘in the field’, hence the demarcation line being uneven as can be seen at the nacelles and around the serial number on the fuselage. The original underside colour would have been Medium Sea Grey – the same colour as on the upper surface. The hatch behind the cockpit has also been replaced with one from a different aircraft.
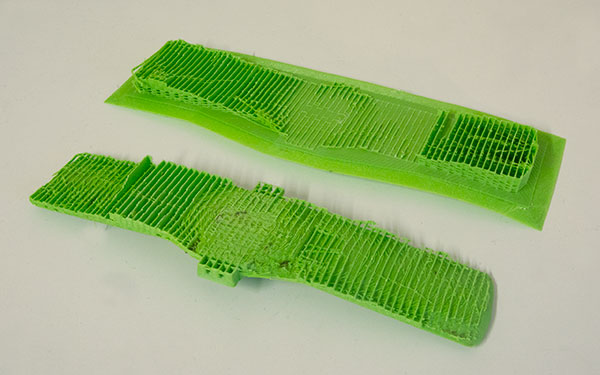
I thought you might like to see what the underside of the Piper Cherokee wing looks like after it has been removed from its support material. The wing is the lower part! As you can see I need to spend a bit of time cleaning it up, filling and filing. The first time I 3D printed this my heart fell with the amount of work to do but it’s really not too bad. There are other techniques of printing the wing but they have their own drawbacks.
January 8th 2016
Finally the Mosquito masters are finished and I am ready for mouldmaking on Monday – phew! This NF II has a totally different ‘character’ to our earlier Mosquito Mk IX. It is hard to explain, it is much more sleeves rolled up ready for a fight. I guess the 0.303s and 20 mm cannon go a long way to convey that impression. This is much more the classic Mosquito fighter, with its early Merlins and propellors as well as the fighter windscreen.

I am really looking forward to seeing the final painted aircraft with its black underside it should look very menacing.
Our first week back has been very productive, lots done and 3 blog posts – wow.
Well I reckon that’s time for a beer and recharge. Have a good weekend everyone.
January 6th 2016
One of my Christmas projects was to design and print the wing for the Piper Cherokee. Several pilots have asked for a model of the Cherokee and we thought it would make an excellent future addition to our Light Aircraft Range. The Cherokee was a precursor to the Piper Archer and had a wing where both the leading and trailing edges were parallel. It became known as the ‘slab’ or ‘Hershey Bar’ wing named after a famous American chocolate bar. The Cherokee also has a narrower tail than the Archer as well as a different undercarriage spat design.
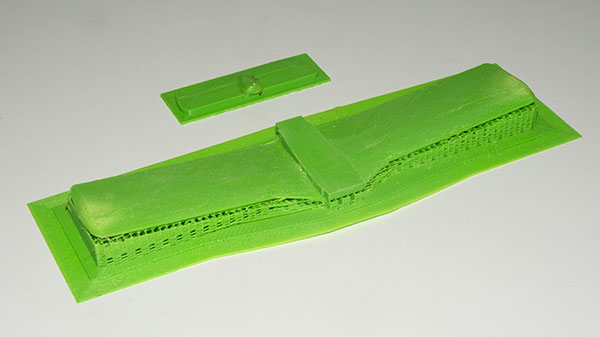
This is pretty much how the parts come off the printer. I have removed some of the waste plastic to make it clearer. You can see under the wing the support structure built up as the wing is printed. This lattice easily breaks away but does leave quite a mess for me to clean up. This is still a good starting point but I will have to spend time filling and filing to get to a finished master.
January 5th 2016
Firstly – Happy New year to everyone! I hope you all had a really good break. I spent most of my free time at ‘Furhall’ lining up some new projects for 2016. I tried to fit the new Olsson Block to the 3D printer but ran into problems so that is a bit delayed. No damage to the printer fortunately caution being the watchword. I have been designing some new aircraft with the 3D program though and here is a quick render of our new Lightning to be released after the Mosquito NF Mk II.
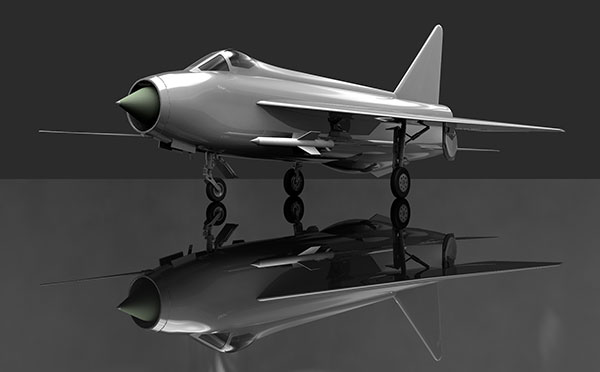
Most of the 3D work is done I now have to start printing the parts. With the Olsson block fitted I hope to print the fine detailed undercarriage which we will cast in bronze for extra strength.