Sera’s Blog 2015
You can now follow the latest news from Staples & Vine with Sera’s Blog.
Updates from the workbench with news on the latest aircraft being sculpted.
I hope you enjoy the blog and I appreciate your feedback.
You can email me directly via sera@staplesandvine.com
 You can keep up to date with my news by following me in the social media links at the bottom of the page.
December 18th 2015
At last the Mosquito is on its undercarriage and is looking very good. I still have a few bits to add, the nacelle ‘chins’ have been shaped but not finally fitted and I still have to work on the belly. I am really looking forward to adding the 0.303″s, other details and pannel lines which will be the last stage before mouldmaking.
Well that’s about it for this year I hope you enjoyed the blog and I would just like to wish everyone a very Merry Christmas and a Happy New Year. I hope to get some 3D printing done, and a few new projects started over the break. I’m off to Furhall !, Sera.
December 4th 2015
A brief announcement – we are now on Instagram! For those of you unfamiliar with Instagram it is a photo sharing site where I can quickly upload images of what we have been up to. It really gives a personal insight into design, sculpting and production. We are of course also active on Twitter and Facebook where we can keep everyone up to date with our news. Our usernames for Twitter, Facebook and Instagram are below.
@StaplesandVine |
||
StaplesandVine |
||
staplesandvine |
December 3rd 2015
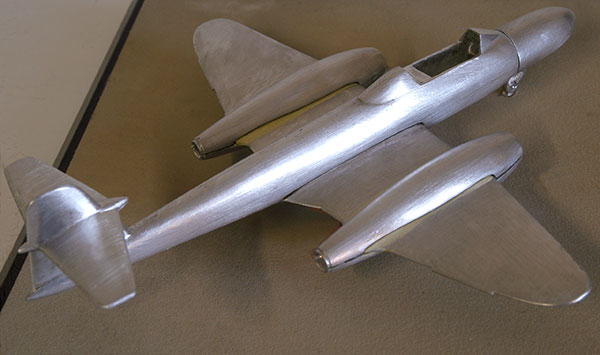
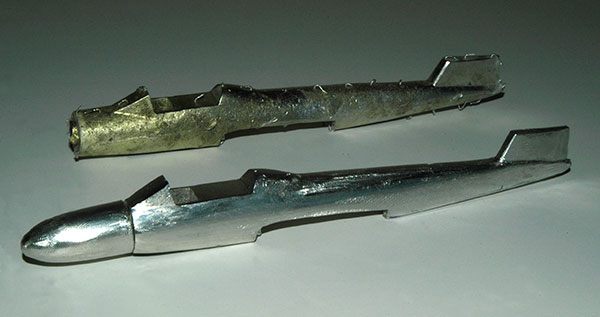
Sculpting is going well on the new Mosquito NF II. I have filed the wing down to the correct profile and reshaped the nacelles for the single stage Merlins. The fuselage is also looking good with the flat screen. I can’t wait to get those 0.303″s and 20mm cannon in. The Mosquito nose is the most important area to get right, so many people get it wrong and miss the character of the aircraft. I haven’t touched the rear of the fuselage yet, the next stage is undercarriage fit, then tail, and a check on the stance before adding detail.
I have just received an add on for the 3D printer. It is called an ‘Olsson Block’ (yes it was invented by Mr Olsson) and it allows me to fit different size nozzzles to print finer detail. This is something I have been trying to achieve for some time with varying success. The small nozzle size (0.25mm diameter) should help me add more detail to undercarriage and cockpit parts. I shall carry out some experiments when I retire to Furhall over the Christmas break.
November 19th 2015
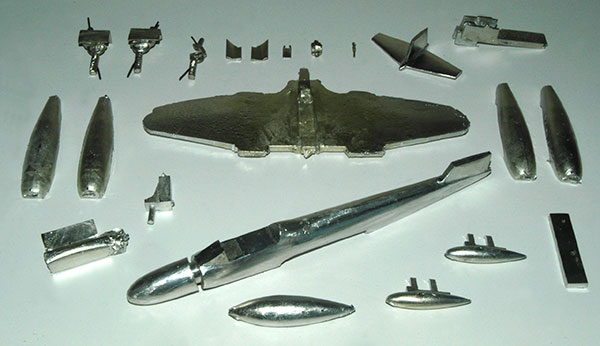
It’s great to get back to sculpting warbirds again. I have cast a new Mosquito wing, fuselage, propellors and parts from our silicone molds and can now begin the process of filing them to size and profile. The Mosquito NF II is very different from our previous Mosquito Mk IX. The Mk II is a fighter with 4 x 20mm cannon and 4 x 0.303 machine guns in the nose, it has the flat windscreen and the early single stage Merlin engines with slimmer profiled propellor blades. The specific aircraft we are producing had its radar removed so it didn’t fall into enemy hands as it was flown in the defence of Malta.
November 2nd 2015
Back in September I asked if anyone had suggestions for our ‘Black projects’ program. Well after considering some really good ideas from you I have decided to go with ‘Furhall’. It relates to my avatar on forums (Furball) and is relevant to Winston.
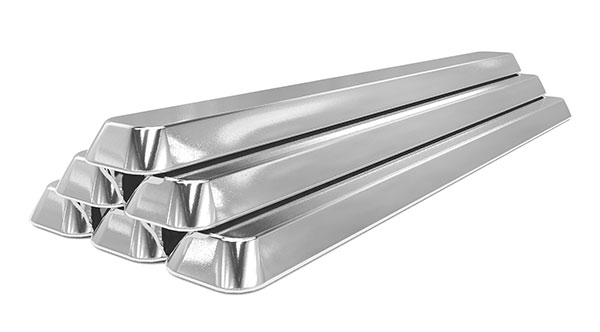
There is a lot going on in Furhall, as well as sculpting there is a wide variety of other projects. The image below is stage one of one of these projects. This was entirely created using the 3D software and forms part of a project I hope to take on next year.
The image is of a stack of raw pewter ingots as we receive them from our metal supplier.
October 22nd 2015
Last week we had a big box delivered and guess what was in it…. another big box, but inside that was our new 9 colour printer, and boy is it big and heavy.
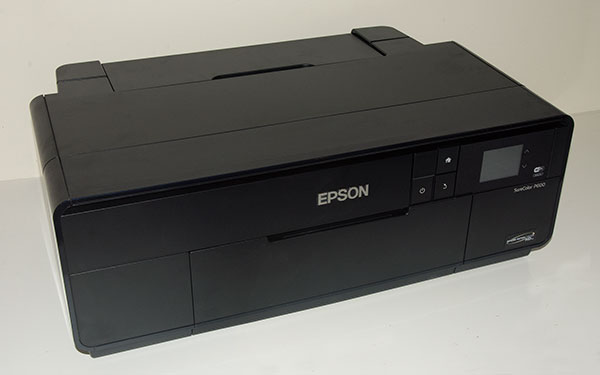
This printer will allow us to print many of our own decals. So where as previously we had shied away from markings which didn’t conform to our regular colour palette we are now able to reproduce a wide range of markings for military and civil aircraft as well as complex noseart.
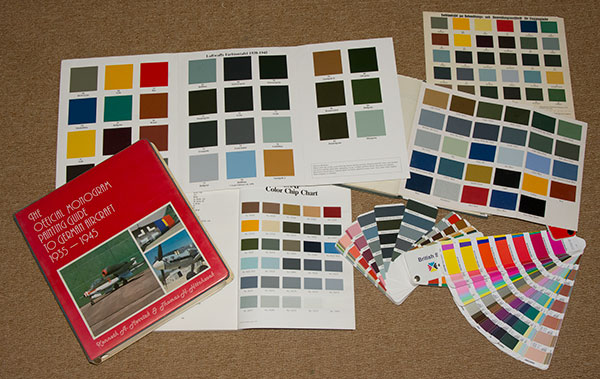
Of course we have to ensure we get the colours right. To do this I will calibrate the pinter to output exact colour matches to our library of colour charts. Our paint charts are all paint chips not printed colours so they will be as accurate as you can get. We have charts for WWII RAF, Luftwaffe, USAF and modern RAF so we can be sure of precise colour matching.
October 20th 2015
We can now launch our range of light aircraft. All the aircraft in this range are available in individual markings. Using new technology we are able to produce these aircraft in the markings of your choice, subject of course to viewing.
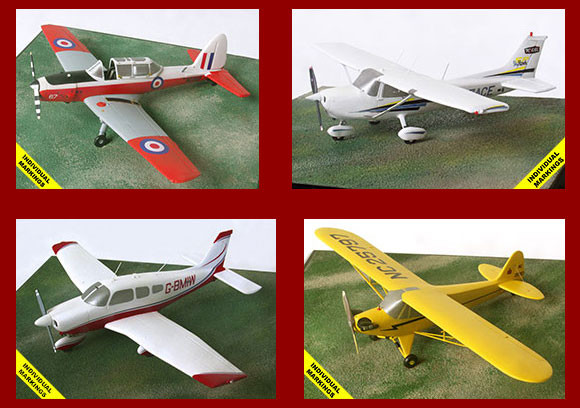
I have also created a new ‘Light Aircaft’ section with button in the left hand column as well as adding a Sera’s Blog button for easy blog access.
This is just the start of our new range so please check the blog for more news. We will continue to add more modern aircraft and of course the classic vintage aircraft.
October 16th 2015
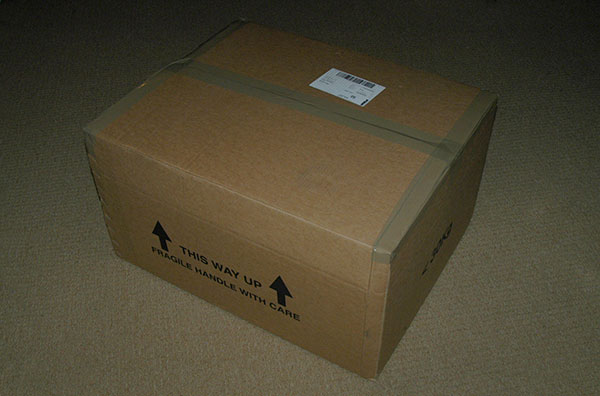
What’s in the box? Well it is big and very heavy (3′ x 2′ x 1.5′ over 20Kg) and was a bit of a brute to get up the stairs to the studio. It will transform the aircraft we are able to produce giving us far more exciting options yet keeping our costs down.
I am currently doing a lot of work on the website and plan to have it all updated on Monday so have a great weekend and be sure to log back in early next week.
October 13th 2015
NEW LIGHT AIRCRAFT RANGE
We can announce the launch of a new range of light aircaft in 1:48 scale but with a difference! All these aircraft will have the option of being produced in your chosen markings. The aircraft are as follows:
de Havilland Chipmunk
Piper J-3 Cub
Cessna 172 Skyhawk
Piper Archer II
We have recently explored new technology allowing us to cast undercarriage in bronze for extra strength on the new aircraft while still maintaining accuracy.
This will open up more options for us in the future so we can produce aircraft we had previously ruled out such as the English Electric Lightning and Airacobra.
The markings will be produced in house on our new 9 colour printer but will
currently only be available to the new Light aircraft range.
So if you own, or have flown one of these, or would just love a
Chipmunk in BBMF markings give us a call.
September 23rd 2015
As I have previously mentioned we have a lot of big projects going on in the pipeline (the clue is in the company name – Divese Images), those of you on our email news list will be aware of what we are currently working on but there are at least 3 other major projects underway. This does not include the various sculpting projects I have simmering. I have a request to make, I need a title for our secret project facility. Something along the lines of ‘Area 51’, ‘Dreamland’ or ‘Skunk works’ would be great. We do have a British Blue cat called ‘Winston’ (see our November 11th 2013 blog) so it would be great to have a reference to him, or pewter, or solid canopies but really the sky is the limit. Any ideas please email me at sera@diverse-images.com there isn’t a prize just the satisfaction of a nod to the world of black projects.
September 22nd 2015
Things are pretty hectic right now at ‘DI Towers’, too many new projects! – more on that another day. We have just retuned from a weekend break at IWM Duxford for the 75th Anniversary of the Battle of Britain airshow. We have not been to Duxford for 12 years, the years have certainly gone very quickly. The show was a sellout on both days and we were really pleased to catch up with some good friends, customers, and stallholders (thanks MD).
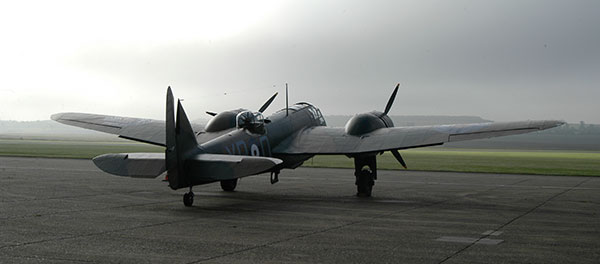
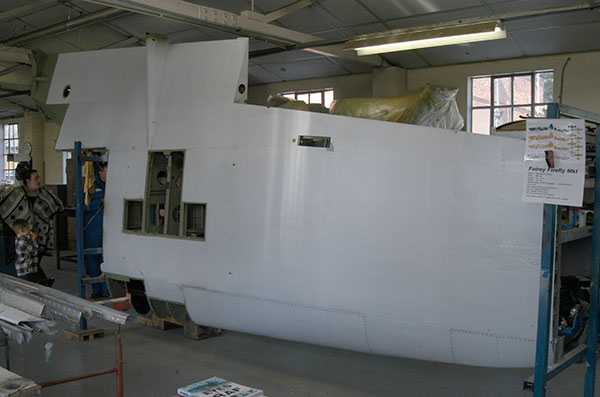
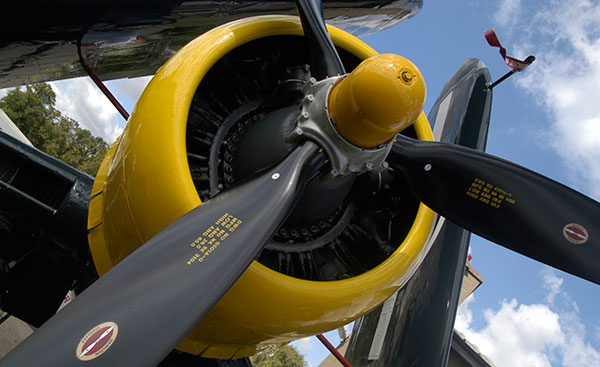
We arrived early and were captivated by the Blenheim Mk I elegant in the morning mist (note to self – 1:72 Blenheim MK I). The flightline walk gives a good oppourtunity to get up close with the aircraft prior to their afternoon displays. The Blenheim is owned and maintained by the Aircraft Restoration Company and supported valiantly by the Blenheim Society who work tirelesly to keep the Blenheim in the air. The Aircraft Restoration Company opened their workshop for the show and it was fascinating to see them restoring a Firefly wing as well as other projects.
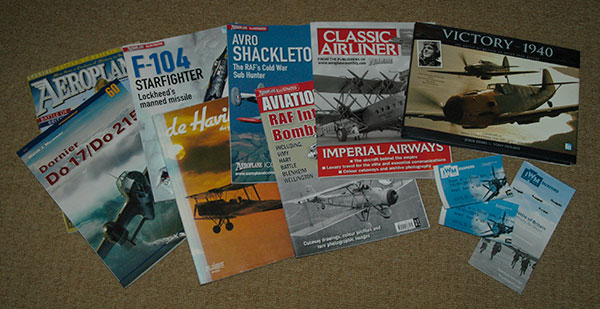
The stands at Duxford are allways a temptaition, for me especially those selling books. I am rather choosy as I am focussed on books with plenty of scale drawings and period photos. AJ Press and Kagero are excellent publishers for these as are the Aeroplane Icons series. I also found a good second hand book on early de Havilland aircraft, and sucumbed to buy the superb new John Dibbs / Tony Holmes book on the Battle of Britain available here.
Of course Duxford is all about the aircraft and most of my time was spent in the hangers taking reference photos of odd aircraft parts for future projets. Details such as undercarriage and propellor markings can often be hard to research. Needless to say I have a lot of photos to go through.
The flying displays were of course excellent. It was a joy to see the Blenheim MK I, to hear so many Merlin engines and remember those who bravely flew to defend our tiny island 75 years ago, to whom we thank.
August 19th 2015
There are lot of secret projects underway right now and we hope to make some exciting announcements pretty soon. What I can tell you is that the 3D printer has been working overtime (night and day) to produce some new aircraft. 3D printing is great, by you do end up with a fair bit of waste plastic.
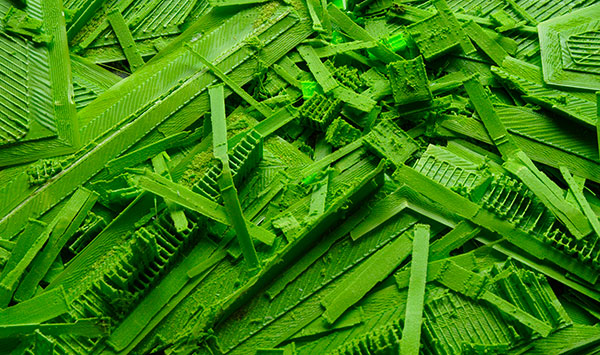
This is because a 3D priter works on the principle of printing very thin layers of plastic one on top of another from a flat base to produce a finished object. If that object has an overhang (like a streetlight) that overhang has to be supported so a scafolding structure has to be created to allow the overhang to be printed. This suppurt structure has to be carefully cut away after the object has been printed resulting in a pile of scrap plastic. It is all a bit trial and error but I am pleased with the result and look forward to announcing our secret project from our very own ‘Area 51’.
August 6th 2015
Finally I am at the end of production and about to start on new projects. However we do have a lot of other projects under development behind the scenes. We are constantly looking at ways to improve on what we already produce, a good example of this is our new certificate which accompanys all of our models.

The new certificte is thermographically printed on high quality paper, this results in the printing being raised from the surface giving it a professional feel. Each certificate is filled in with the aircraft title and limited edition number before being signed by myself. Some of you may notice that the signature is Sera Staples, not Sera Vine, this is because Tim and I are married and we have only now managed to reprint the certificates. There are still lots of other projects underway (some big some small) so please bear with us and follow the blog to keep up with all the news.
June 19th 2015
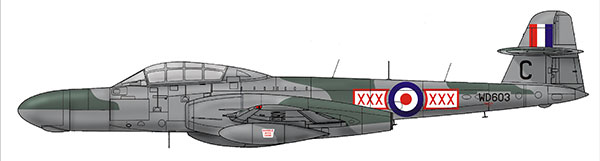
A breif break from production to tell you a little about our next release, an all new Mosquito NF MK II
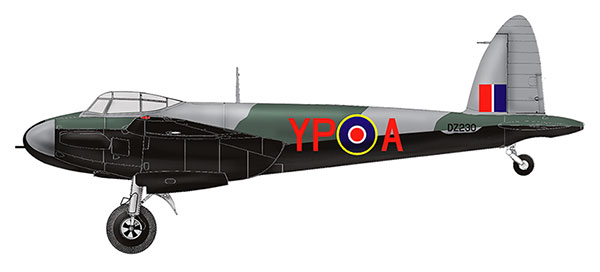
The Mosquito nightfighter we have chosen was stripped of its radar and was flown in the successful defense of Malta.
June 8th 2015
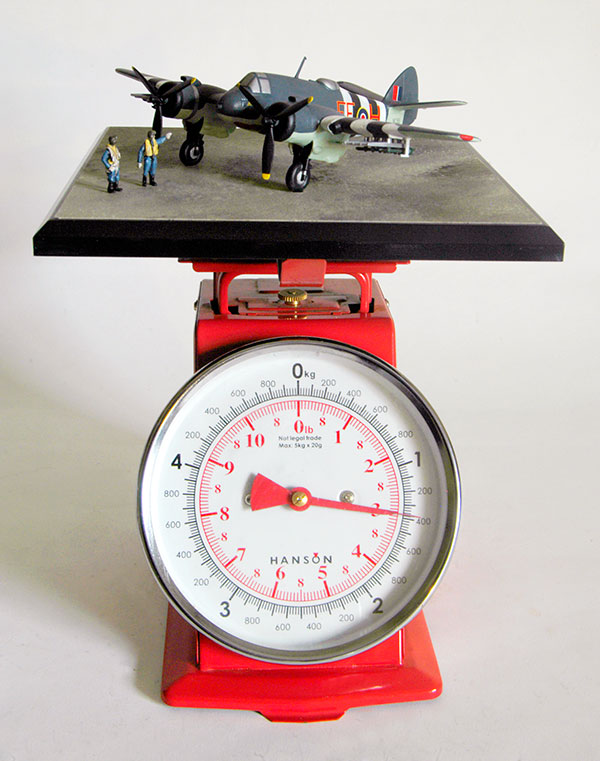
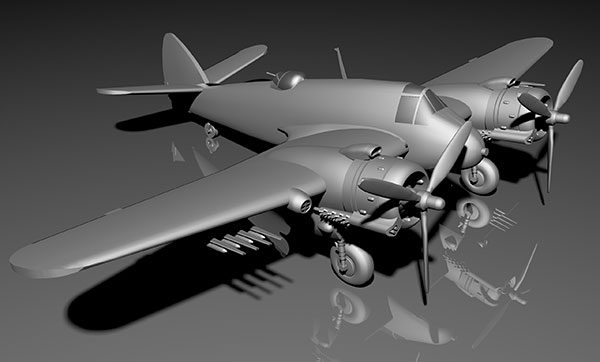
The Beaufighter is now in production and has been a real success regarding the latest origination techniques. The finished aircraft (not including the base) weighs in at 838 grams or 1 lb 13.5 ozs and as ever that is solid pewter – no plastic here. It really is a heavyweight in every sense.
May 29th 2015
Nearly there, most of the detail is on the Beaufighter now. I am about to make a to do list of all the parts that still require attention. The engine cores and undercarriage still have to be detailed, and I am yet to fit the exhausts. It is surprising how long it takes to clean up and fit some parts yet others can be very quick. It certainly is a chunky aircraft but all muscle. With its rockets and cannon no wonder it earned the nickname ‘Whispering Death’.
While thumbing some ancient coppies of Aeroplane magazine I found an advertisement for the Beaufighter and couldn’t resist sharing it with you. It’s not a Mk X as the magazine was from September 1941 but it really does show the Beaufighter off so well.

May 22nd 2015
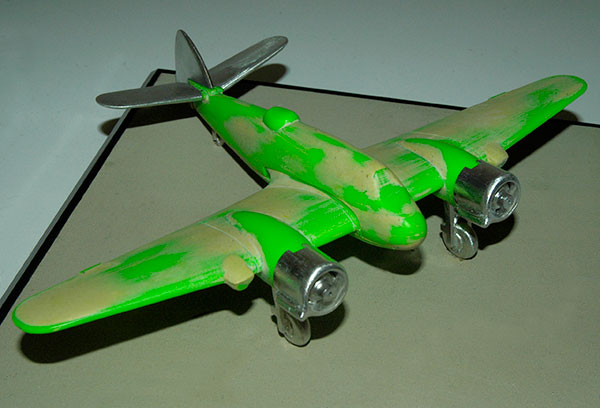
Just a quick post! I now have the Beaufighter on its undercarriage, and the tails and nacelles fitted. I couldn’t resist taking a photo as it is looking so cool. Can’t wait to get the rockets and props on. Better get back to the files – lots still to do.
May 20th 2015
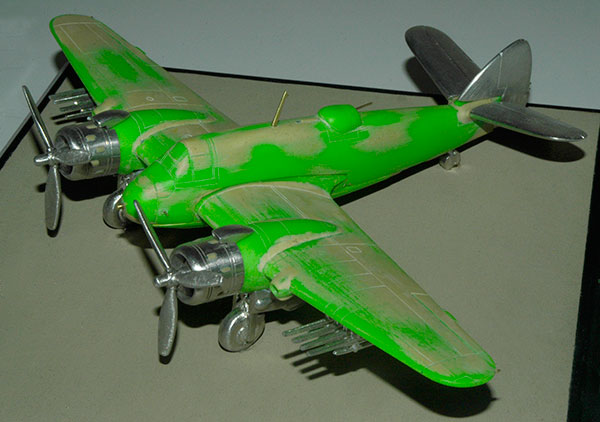
Beaufighter sculpting is going well desipte strugling to wrap my head around the complexity of the number of parts, and how to create them. Some parts have been originated totally from Milliput before being converted to metal masters, others 3D printed then modified and converted to metal, with the larger 3d printed parts filled and sanded before adding detail.
You can see the wings and fuselage have received a lot of Milliput to fill the lines from the 3d printing so that the final finish is smooth. The 3d printer has certainly sped up the process but still every part is hand finished. Metal masters are now cast and ready to be filed up to their correct profiles, then I shall start fitting the parts together.
The Beaufighter certainly is a very tough looking aircraft further enhanced by the eight 20lb rockets. Apparently 20lb rockets were used on the Beaufighter rather than the heavier 60lb rockets (as used on the Typhoon Mk IB) because the 60 lb rockets ‘fell’ as they were fired and the 20lb ones flew straight.
May 12th 2015
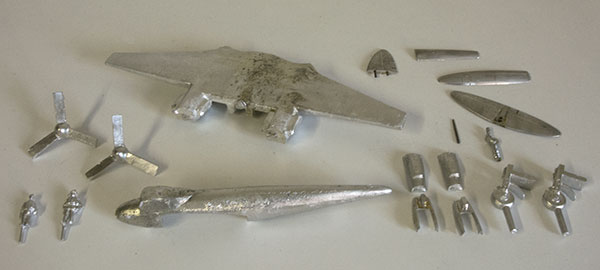
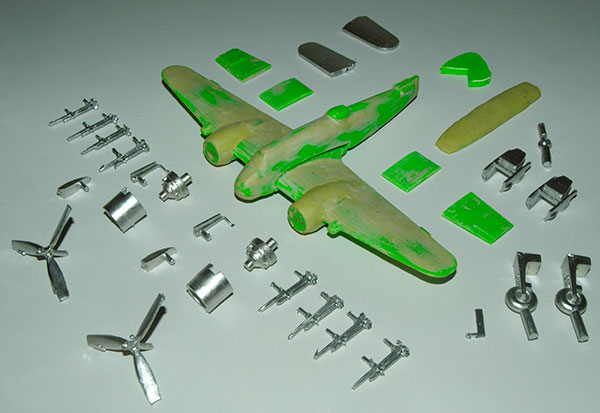
An important day today – the start of Beaufighter sculpting. While I have working on production the 3D printer has been whirring away printing parts so I am already quite advanced.
This is a sample of what the printer produces. You can see the layers that the parts are printed in like contours on a landscape. However you can also see the quality of the prints. I will still have to do a lot of filling and filing to get a good finish before I can add surface detail.
We do get some close encounters here, yesterday it was Chinooks (one pass was very low) today it is F-15s, airshow season is on its way.
April 23rd 2015
I have been a bit lax on the blog recently mainly due to production as our new releases have gone so well, so here is a little treat – our next release.
The Beaufighter TF Mk X in 1:72 scale has been evolving on the computer for 3D printing over the past few months and will soon be printed. It is a big project and even after printing I will need to do a lot of hand work to smooth the masters and add the detail. Technology has its limits and so far the 3 D printer will not produce masters of the finished quality I require. It is merely a tool to speed up the process.
April 7th 2015
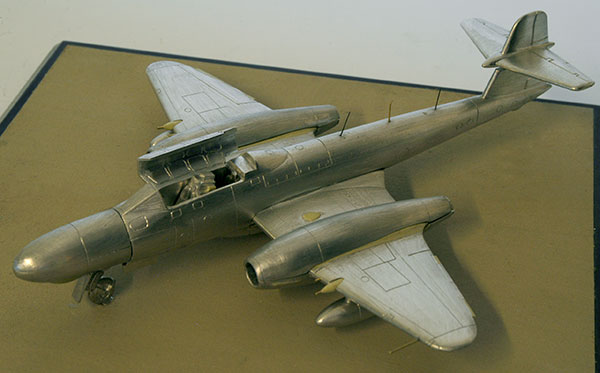
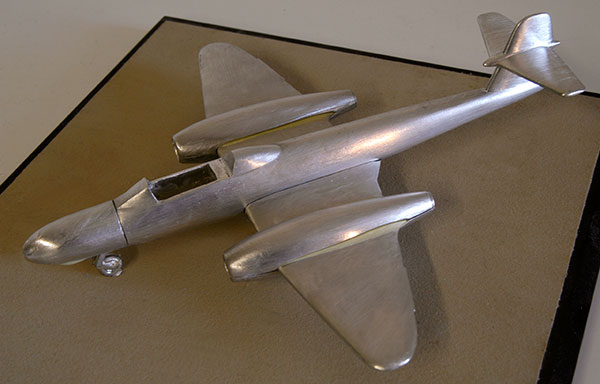
The Meteor NF Mk 11 is now in production, and the story behind ‘XXX’ can be reveled. The Meteor NF Mk 11 certainly adds to the variety of our relases so far this year. Next up will be the Beaufighter TF Mk X, an aircraft I have wanted to sculpt for a long time. We are now sold out on the 1/48 scale Spitfire Mk I of ‘Big X’ signed by Geofrey Wellum.
March 31st 2015
The Meteor NF 11 masters are now finished and I am very happy with the result. Tomorrow I will be mouldmaking and then onto the sample for photography. Recently 29 Squadron have celebrated their 100th anniversary flying the latest Typhoons. Have you ever wondered why their squadron markings is XXX? Well, all will be revealed in the Meteor history. I also found this video of the Coronation flypast on youtube which I hope you will find interesting.
March 25th 2015
Just a quick post to show how the Meteor NF 11 is coming on. Dryfitting the parts shows up any alignment errors and is a good check for the ‘sit’ of the aircraft. So far all looks good and I can now start adding some detail and pannel lines. The long fuselage and nacelles give the Meteor NF 11 a lot of character. The overal length of the fuselage is about 21 cm / 8.25 inches.
March 20th 2015
This week I have been sculpting the new Meteor NF 11 nightfighter which has become a bit complicated. We have already produced one Meteor, the Metoer Mk 1 so how hard can it be to make a new one? Well when I designed the Mk 1 I did allow for some parts to cover later versions (the tailplane and undercarriage) but many parts have had to be created from scratch. The fuselage has been adapted and remoulded, the nacelles are totally new as are the radome, belly tank, wing tanks, and canopy. Fortunately the 3d printer has sped up the sculpting and helped a lot with the nacelles, and fuel tanks.
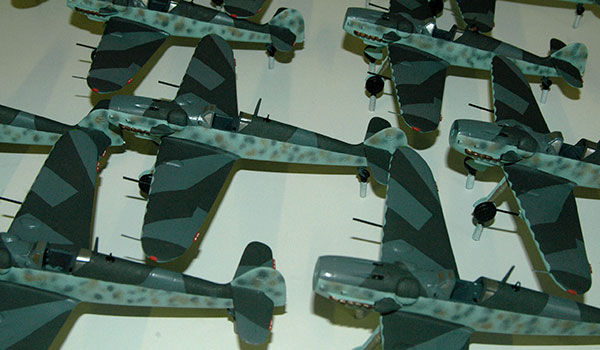
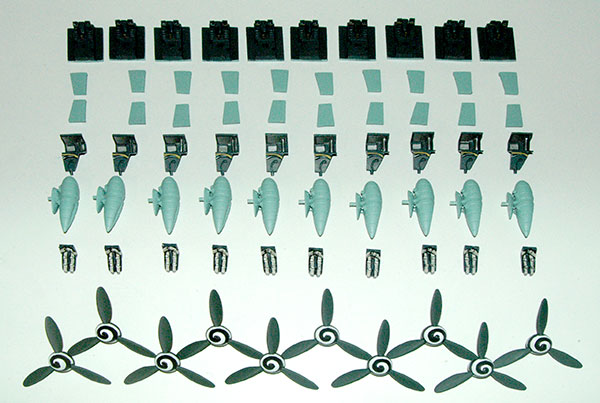
The next picture is of my new generic fuselage casting which will allow for all later marks of the Meteor. The rear fuselage is as it came out of the mould. The front fuselage has had some attention from my biggest file and had the radome test fitted but still has a way to go.
The second picture is of all the parts going into the Meteor – a lot of filing to do!
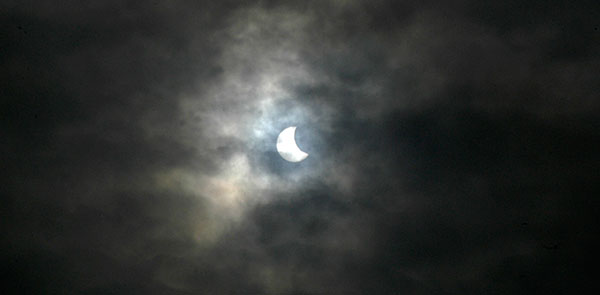
Talking of celestial objects, there was an eclipse today.
March 13th 2015
As you know we produce everying by hand. That includes casting ,assembly, painting, decaling, and basing. Here on the first batch of our latest release the Bf109G-6/U2, all the mottling along the sides of the fuselage is sprayed with an airbrush by hand. In this case we sprayed the two mottle colours, RLM 02 and RLM 75, just like the real aircraft.
Many of the detailed parts are painted separately and added after the decals have been applied. Cockpit interiors, propellors and other parts take a surprisingly long time to finish especially the spirals on the spinners. Here the belly tanks still need their stencil decals to be applied. The stencils explain that the belly tank is not a bomb and that anyone finding and returning a belly tank will get a reward.
March 3rd 2015
I don’t get out much, but on a recent visit to the newsagent I picked up a copy of Aeroplane Icons. I was impressed, it had lots of history, technical detail, profiles, scale drawings, and photos I haven’t seen before – just what I like. Aeroplane Icons is a series with each issue focusing on a different aircraft with about 3 new issues a year. I was obviously a bit behind the times but they do back issues – hooray! Yesterday I received a box with all the available issues, lots of inspiration and bedtime reading. If you want to find out more here’s the link www.aeroplaneicons.com. Note to self – ‘get out more.’
![]()
February 19th 2015
Sorry it’s been a while since the last post, but there has been a lot going on. The new Hendon Mk II and Bf109G-6/U2 are now in full production and we have been planning releases for later in the year. In my spare time I have been working on some new 3D aircraft projects, the technology allows us to produce aircraft I would previously have shyed away from. It is all very exciting and opens up many new avenues. Over the Christmas break I normaly get pretty mucky sculpting with Milliput but this Christmas I stayed clean and managed to create 3 new aircraft on the computer one of which is here…
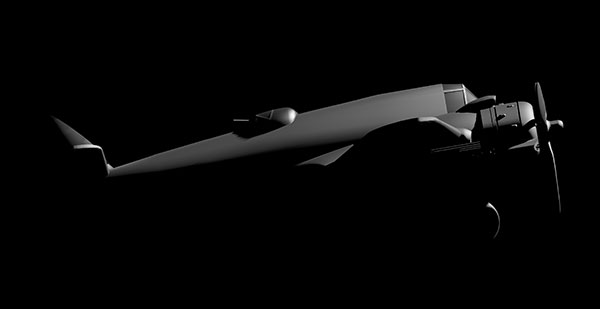
As you can see I am still learning about lighting and applying camouflage and markings, but so far the results have been good.
January 8th 2015
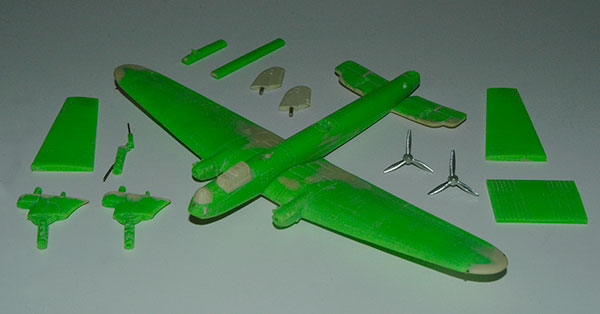
First of all let me wish everyone a very happy new year. I spent most of the Christmas break on the computer working on future sculpting prjects, but more on that later.
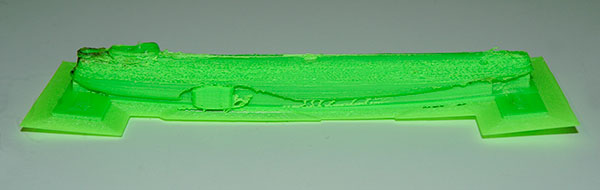
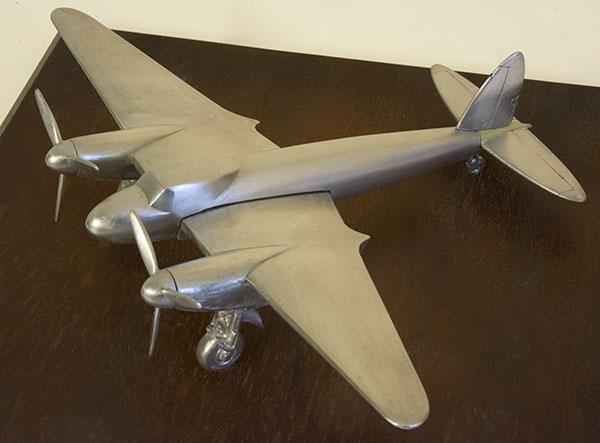
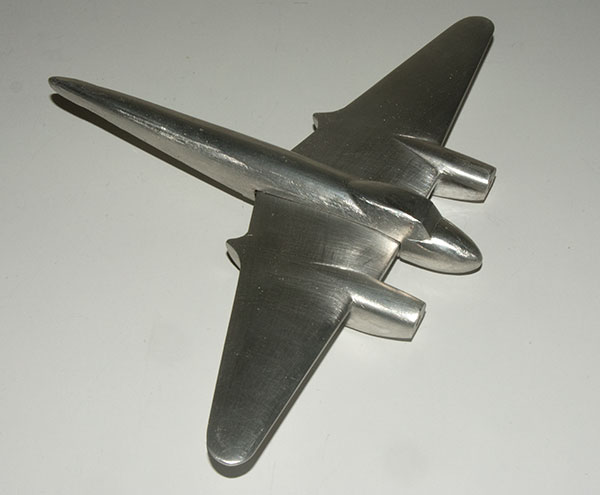
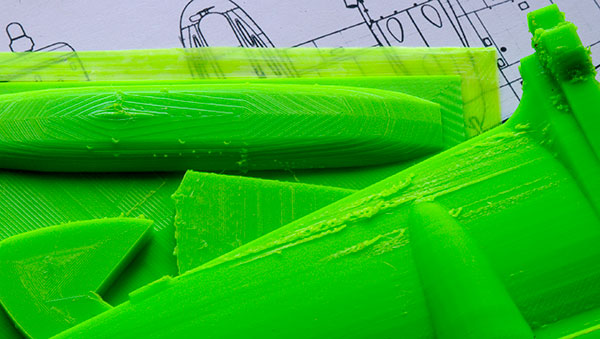
Many of you have asked me what the results of the 3D printer are like. Well the photo below of the Fairey Hendon masters should give you and idea. After a fair bit of claening up this is the result. We are ‘printing’ with a green ABS (Acrylonitrile Butadiene Styrene) plastic the same plastic Lego is made from. I have fitted the wing fuselage and tail together for the photo. It is not without its problems though, I think this is more down to my settings for the printer and I am sure the quality of the prints will improve as I learn more. I have used Milliput to correct issues and have scribed in pannel details as with the metal masters. The props were created in the old way and I have made the vertical tails from Milliput.
The second photo is of an early failed fuselage print. This is my third attempt at a Hendon fuselage. Here you can see the principle behind the 3D printer. Layers are built up in ABS from a flat glass bed from a nozel which moves around to print each layer. Once a layer is printed the bed moves down a fraction and another layer is printed on top. As you can see the ends of the fuselage have lifted this is known as warping and is caused by the upper layers cooling, contracting and pulling up the ends. This is prevented by having a heated print bed which keeps the print warm. I turned up the temperature for the next attempt, and was successful.