Sera’s Blog 2014
You can now follow the latest news from Staples & Vine with Sera’s Blog.
Updates from the workbench with news on the latest aircraft being sculpted.
I hope you enjoy the blog and I appreciate your feedback.
You can email me directly via sera@staplesandvine.com
 You can keep up to date with my news by following me in the social media links at the bottom of the page.
December 18th 2014
Another year draws to a close and I never thought I would be in this situation 12 months ago. The 3d printing project has really transformed our sculpting ability in so many ways. Ultimately it is just a tool still leaving a lot of hand finishing but it has sped up the process. As an exercise I decided to sculpt an aircraft from scratch in my spare time on the computer for future release. I chose the Fairey Hendon as we had markings printed and it looked fairly simple; plain fuselage, simple wing, only two engines, basic undercarriage. How hard could it be? Answer – challenging, particularly when there is so little information and drawings don’t relate to photos. The computer design work was easier than I thought and what I have learned will make future aircraft easier and quicker.
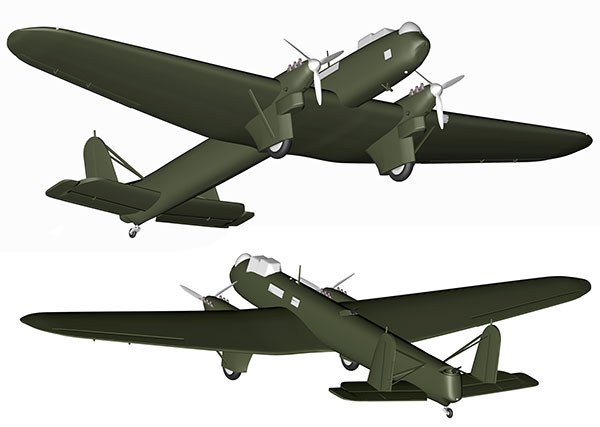
The picture is whats called a ‘render’ which is a graphic image based on the 3D model. I haven’t worked out how to get the markings on yet but give me time. At this stage most of the Hendon is complete, the model is then broken down into component form for 3D printing when it will be refined for production with further detail added. Not all the detail here will print successfully but it will give me a base to work from – more on that next year.
That just leaves me to thank all our customers for their support and wish everyone a very merry Christmas and a happy new year.
December 5th 2014
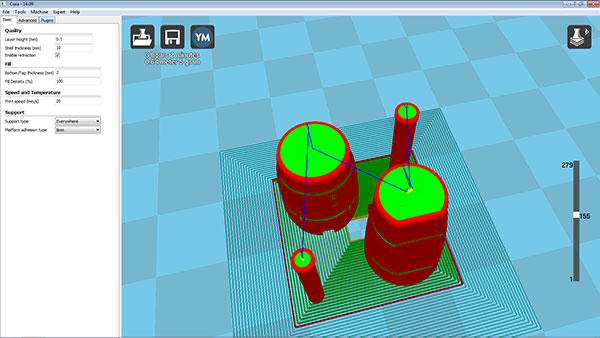
3D printing is going well but I have discovered that parts print better if they are built up from a flat base. With this in mind I have split the Bf109G belly tank in two. The following image is of the belly tank in the 3d printing program. The two vertical cylinders are pegs to assemble the belly tank and fix it to the aircraft. Here I can change the settings to ensure a good quality print.

I also check how the part will print by viewing the different layers. Here I can check for errors in the printing process. The slider on the right allows me to view any of the layers and at the top of the screen I can see how long is will take to print, in this case just over 3 hours.
The ultimate goal with the 3D printer is to produce more accurate masters quicker. I will also be able to create variants of aircraft more easily as the parts can be edited on the computer before being printed.
The quality of the printed parts currently requires a high degree of cleaning up and hand finishing, detail such as pannel lines and control surfaces still have be added by hand. I hope this will improve as I become more experienced with the software and printer.
November 27th 2014
I have started using the 3D printer but first I had to design some parts on the computer for printing. The following screenshot is of the 3D program I am using.
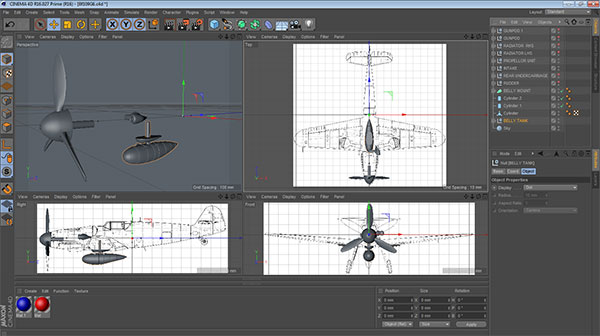
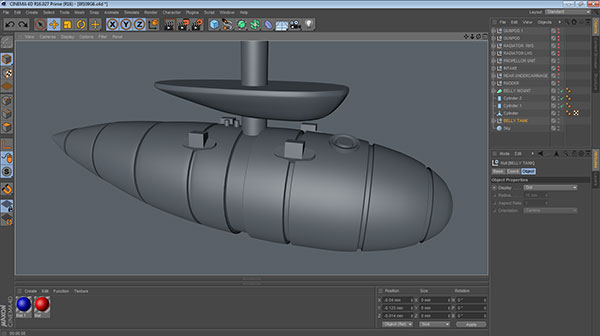
The screen is divided up into several views: side, plan, front an perspective. Using these views objects are built up from basic shapes to form the complex parts needed for the aircraft. Here the belly tank for the new Bf109G-6/U2 is nearly ready for printing.
The objects are then converted into a special file format which the printer can understand and produce the part. So far there has been a lot of trial and error, but progress is being made. The printer has a lot of settings and certain objects are very awkward to print giving me a few headaches. The software however is very easy to use and can even do animation – I don’t think I’ll get a call from Hollywood just yet.
November 19th 2014
Well here it is our latest bit of tech. This is our 3D printer, it will allow me to design masters on my computer and then ‘print’ them out as solid objects. The ‘prints’ still require a lot of finishing and the fine detail to be added by hand but using this technique we will be able to produce more of the unusual aircraft we are known for more quickly.
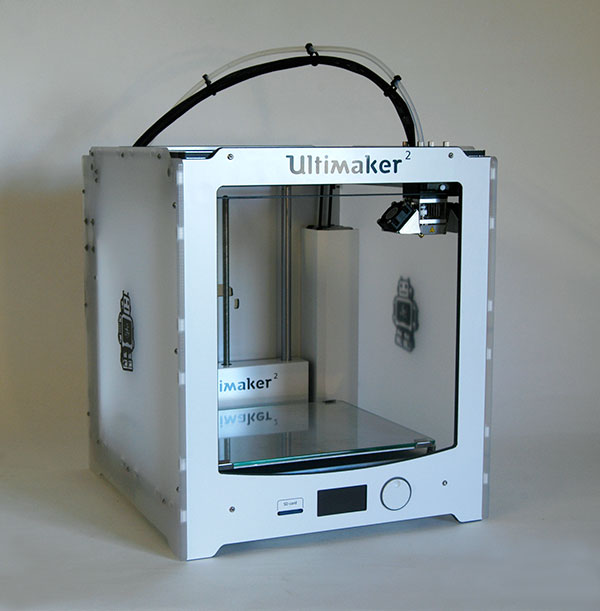
This type of 3D printer works by feeding a plastic filament from a reel (mounted on the back) via a tube, to a nozel which then melts the plastic. The nozel then moves around to create thin layers of the object one at a time. To see a good demonstraion of how it works watch this video. We are also looking at some other technology to give us more versatility in other areas.
November 11th 2014
Whew! Sorry for not posting any updates for a while but I have just finished producing all the 1/48 scale Typhoons and Spitfires we have had orders for. I just have a few last orders and then it’s back to sculpting – hooray!
I am pleased to say that we are now sold out on the Mosquito, Wellesley, Barracuda, and Firefly. They can now be found in the ‘Struck off Charge’ section of the website along with all our other sold out aircraft. It looks like I shall have to sculpt another Mosquito and some more FAA aircraft. What to choose? It’s back to our library for some ideas.
We have also been busy researching some new technology and hope to make an announcement shortly.
August 2nd 2014
Sadly I have just heard that a few days ago Wg Cdr Bob Foster DFC passed away. Last year he very kindly helped us with the release of our signed 1/48 scale Hurricane Mk I in his markings. His actual aircraft, UP-W R4118, has now been restored to flying condition by Peter Vacher and regularly displays on the airshow circuit. He will be missed.
July 22nd 2014
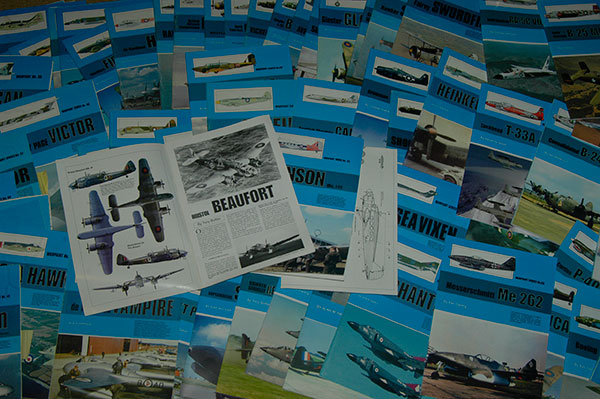
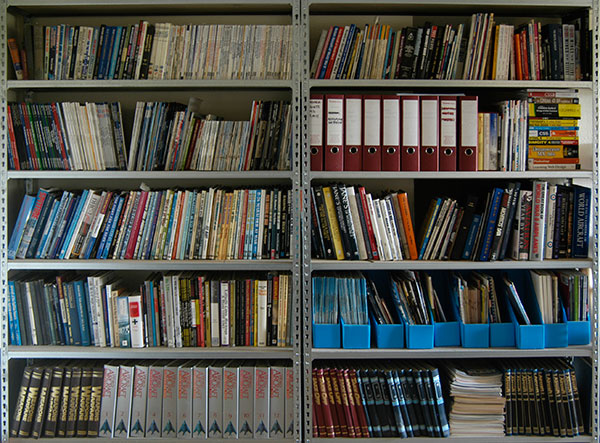
Production is going well,but I have just recieved another delivery of the excellent Warpaint books to add to the library. Their basic format includes a comprehensive history, 1/72 scale plans, and lots of colour profiles. We have been buying them since they started, and they form a key reference for any new aircraft we plan to release. We have now subscribed to their continual purchase scheme so we get every new release as it comes out. For more details visit www.guidelinepublications.co.uk.
July 11th 2014
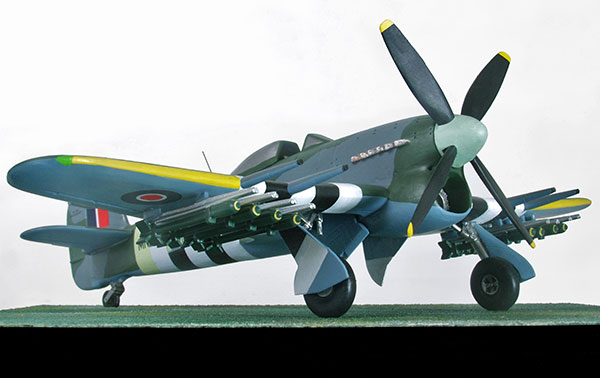
At last our 1/48 scale Typhoon Mk IB is in production, and it a very impressive aircraft. We have had lots of excellent comments for which I am really greatful, thank you very much everyone. Way back on May 29th I predicted the weight of the finished Typhoon to be 900g. I had my doubts at the time thinking it sounded a bit heavy but on weighing the final result it came in at 905g NOT including the base. In ‘old money’ it weighs almost 2 lb and is all pewter no plastic involved.
June 27th 2014
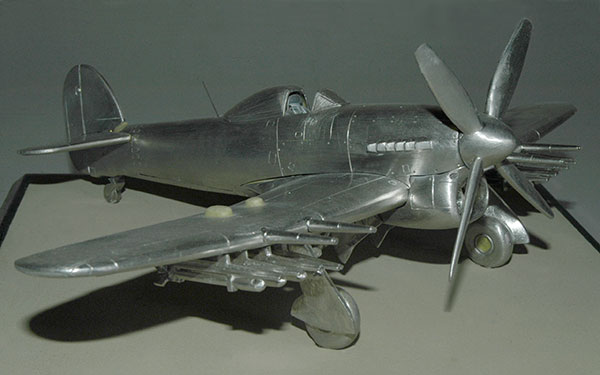
I am getting onto the home straight now, and I am pleased with the result. The rockets cannon and interior are complete. I just have some undercarriage detailing and final tidying to complete before a last check and then it’s onto moldmaking. The masters certainly have a lot of presence and I am really looking forward to seeing the Typhoon painted and with it’s D-Day stripes. I am going to have a break over the weekend and come back to it with fresh eyes on Monday. I will make a list of all the issues and details left to finish, the more I look the more I see but the better the result.

June 24th 2014
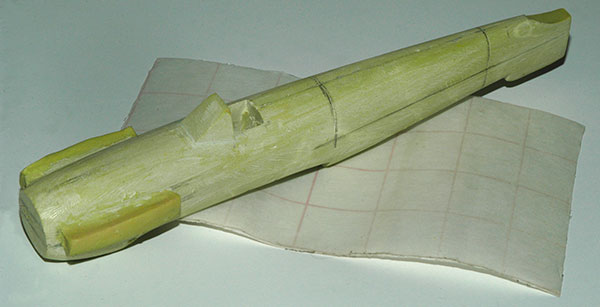
At last I have finished the rockets and cannon! Cleaning up the rockets has taken forever. I reckon each one has taken an hour from the rough metal master. The photograph below shows the stages from Milliput master to rough metal casting to finished metal master.
I am really pleased with the result of the hours of filing and in the next photograph you can see the finished rockets and cannon fitted to the wing. It has taken a lot of tinkering to get them all lining up correctly although on the real aircraft they were often set at different angles to give a spread of fire. There are still file marks to be polished out.
June 20th 2014
Finally the Typhoon is on its undercarriage and I have started adding the pannel lines to the wing this will help ensure the rockets and cannon are correctly aligned. As ever detail has been added to the underside of the wings and to reduce the bulk of the wing it has been hollowed out from below. The Typhoon wing is over 1cm thick in places and this hollowing has taken a lot of grinding. Regardless of this weight loss program the Typhoon will be a very heavy model, especially as we only use pewter and our models contain no plastic.
June 18th 2014
Typhoon sculpting is going well this week. It is good to see those rough castings starting to shine and the final shape of the aircraft come through. Strangely the level of distortion in the castings from the silicone molds is much less than normal. Either the heat from last Thursday played a part or I am finally getting better at moldmaking after 18 years. I am really pleased with the fit of the parts and how well they blend together. There are some quite complex curves around the prolpellor and chin which I have paid particular attention to. Tomorrow I shall be working on the undercarriage and the stance of thee Typhoon which is crucial to it’s character. I can’t wait to get the cannon and rockets on but I have to do the undercarriage first.
June 13th 2014
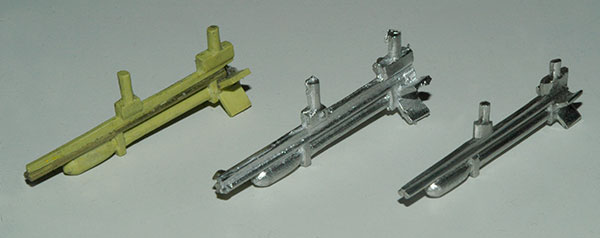
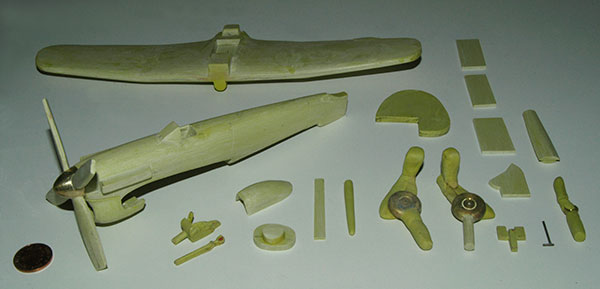
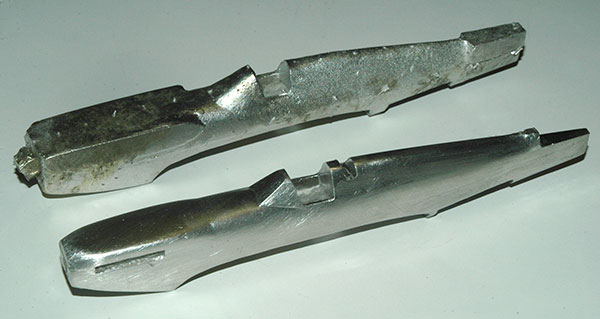
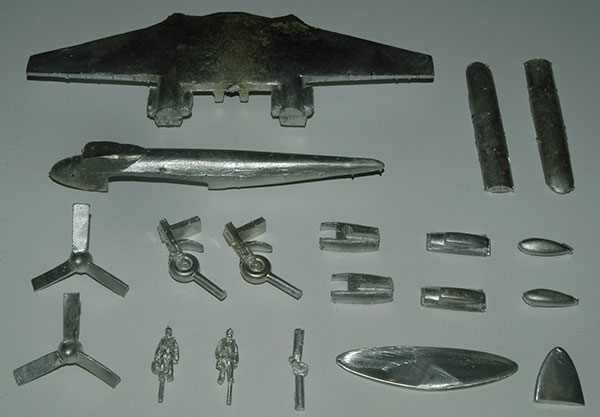
I spent a very hot afternoon yesterday casting the metal masters for the Typhoon. I normally cast about 3 or 4 off each part and then select the best to be reworked. The photograph below shows my final selection of parts to be worked on. I have removed the feeds and airvent tags. Given the size of some of the parts I am pleased with the result.
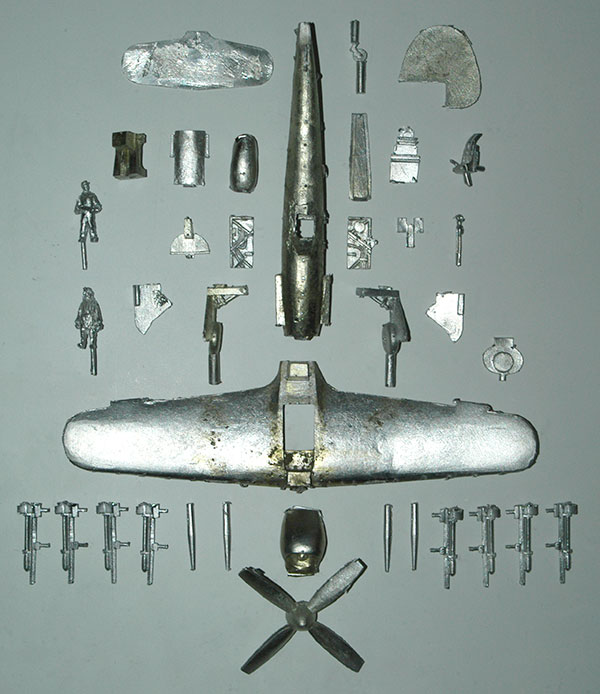
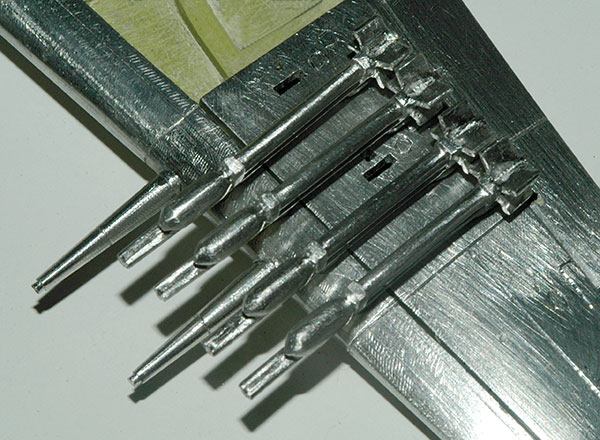
This photo is of the fuselage to give you and idea of how rough the castings can be for this size of part. I am pretty confident I can get a good result from these castings, despite the roughness, it will just take a lot of filing.

June 11th 2014
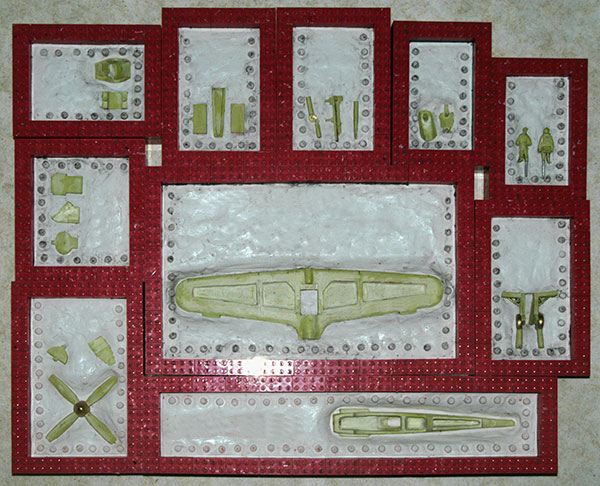
The first half of the Typhoon silicone molds have been poured now I just have to prep them and pour the other side. This will allow me to convert the Milliput mastsers into metal which I will then work on so I can make the production molds. I have used a huge ammount of silicone in these molds to give you a sense of scale the propellor has a diameter of about 3.5 inches (90mm). This is a very big aircraft.
June 5th 2014
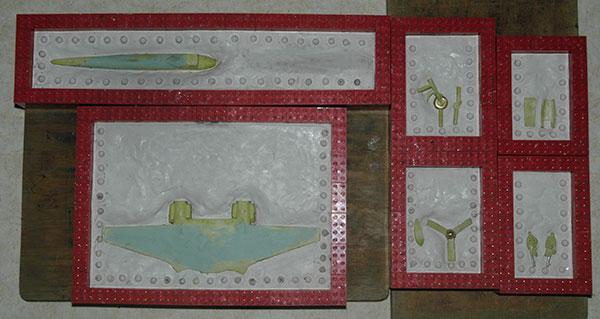
The Milliput masters for the Typhoon are almost finished, just some final tweaking and the figures to sculpt. As you can see from the first photo what were just blank slabs of Milliput are now cockpit parts and undercarriage doors.
The second photo gives you an idea of the level of detail I will be going to in the cockpit. The sidewalls, instrument pannel, seat and armour are all separate parts. The 60lb rocket and rail is now complete. The rocket fins are oversize at this stage and will be trimmed back on the metal masters.

Next week I shall be making the silicone moulds which will allow me to convert these Milliput masters into metal. The metal master stage is really when all the parts finaly come together and the character of the aircraft starts to show through.
May 29th 2014
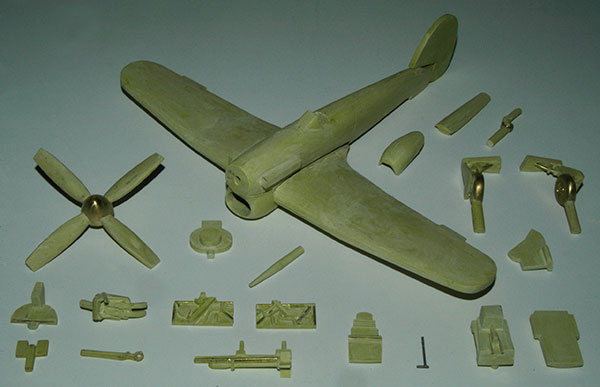
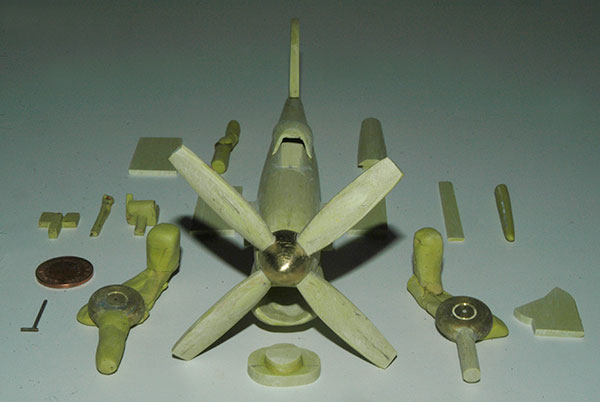
Typhoon sculpting is gonig well so far with time spent sculpting before Christmas really paying off. After initialy deciding on the breakdown of parts the first photo shows the rough first stage of the Milliput parts. The radiator chin is just a rough tube shape and the turned brass wheels and spinner are yet to have Milliput added.
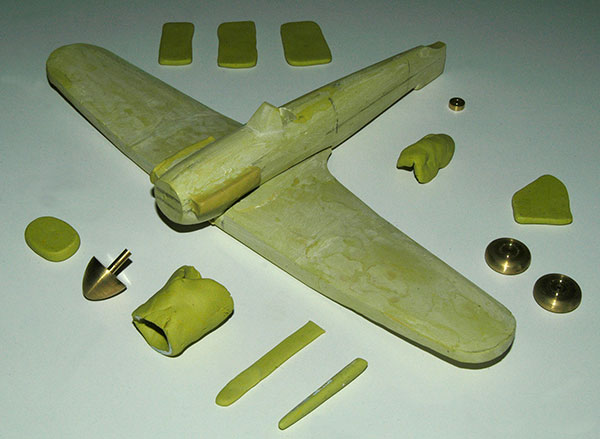
The second photo shows the progress of the parts with the propellor blades added and the undercarriage with early additions of Milliput. The seat, joystick and vertical tail will be modified from the Hurricane masters. I deliberately made the Hurricane vertical tail larger than necessary at the time to create a ‘generic’ part which I can modify for many future aircraft. The coin is a 1p coin (about the size of a 1cent coin) to give a sense of scale. The flat rectangles will be detailed to form the cockpit sidewalls, and the flat strip in the middle will become the rocket rail.
I couldn’t resist taking a head on photo showing the radiator and monster propellor. This is going to be a beast of a model, I reckon the final model will have a weight of about 900g making it one of the heaviest models we have made. I am really looking forward to getting it into metal, It is quite a handfull even now. The Typhoon will be mounted on the same size base we use for the 1/48 scale Hurricane Mk I, Spitfire Mk I, Spitfire Mk IXC, and Bf109E-4/B.
May 22nd 2014
An important day today (possibly more than the European elections) I have resumed sculpting the Typhoon Mk IB. Today has been spent checking books, scanning resizing and printing working drawings from which I can create the Typhoon. We have over the years built up an extensive library, so our source information is pretty good.
There are quite a lot of Typhoon books and drawings available but finding reliable sources can be a problem. I have chosen the drawings produced by Arthur Bentley. His drawings are the best available and from his website you can see he has created quite a range over the years, illustrating some fascinating subjects. I have also been spending some time quietly working out how many parts I need to sculpt and checking details of the specific Typhoon we are releasing. Our Typhoon MN625 will have the later sliding canopy, 4 blade propellor, Tempest tailplane, and early version rocket rails with 60lb rockets. Early rocket rails had two runners which the rocket ran inbetween, later rocket rails had a single runner to which the rocket ran on the outside. After the war the rails were omitted completely. Here is a video of 60lb rockets being assembled and fitted to a Typhoon with our style of rail video.
March 27th 2014
Mosquito assembly continues, and thanks to MD I now know a group of Mosquitos is called a ‘scourge’. Back to the workbench.
March 26th 2014
Back on production this week, lots of orders, catching up on Mosquitos. I wonder what the collective name for a group of Mosquitos is? When I cast a batch of aircraft I put each batch in a storage box so the parts don’t get mixed up. Below is a batch of fresh Mosquito castings ready for assembly.

A few days later and they are ready for dispatch after final quality checks.
March 14th 2014
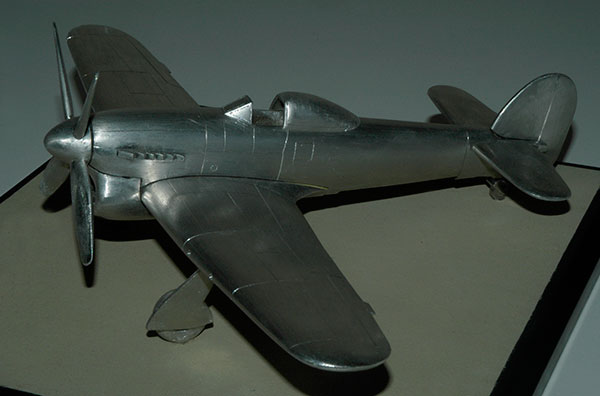
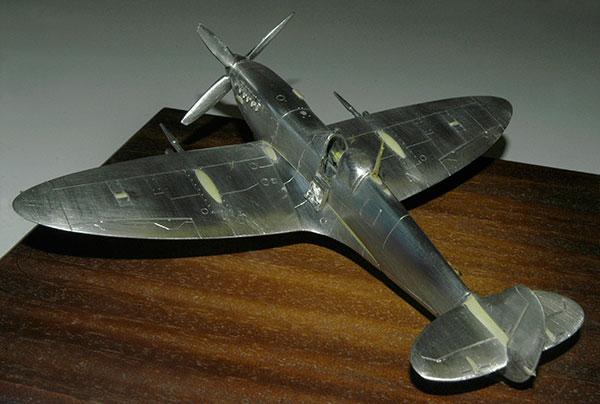
The metal masters for the Spitfire Mk IXC are now complete and I am so pleased with the result. I have taken some quick photos of the finished Mk IXC. Here are a few distinctive points of the Mk IXC. The fishtail exhausts, bulged canopy, 4 balde propellor, cannon, revised mirror and of course the longer two stage supercharged Merlin engine.
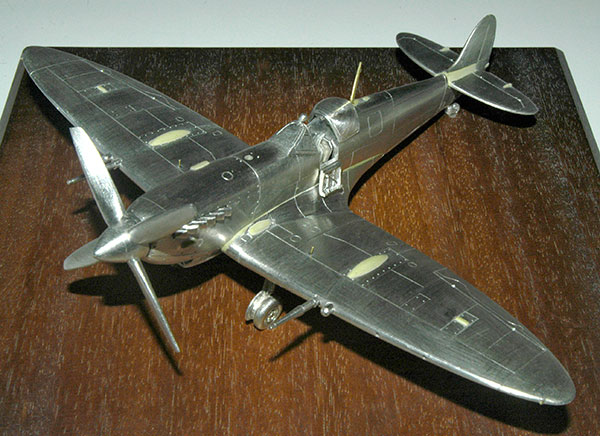
The underside shows the classic paired radiators of the Mk IX and gives a good view of the 4 blade propellor and fishtail exhausts.
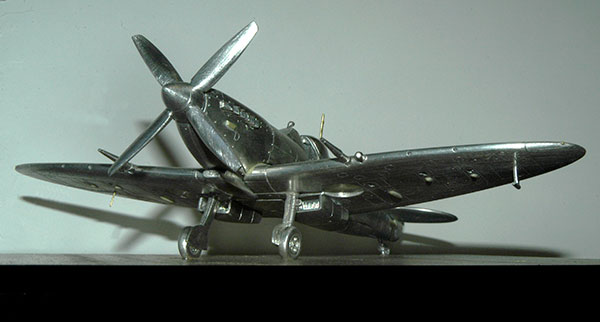
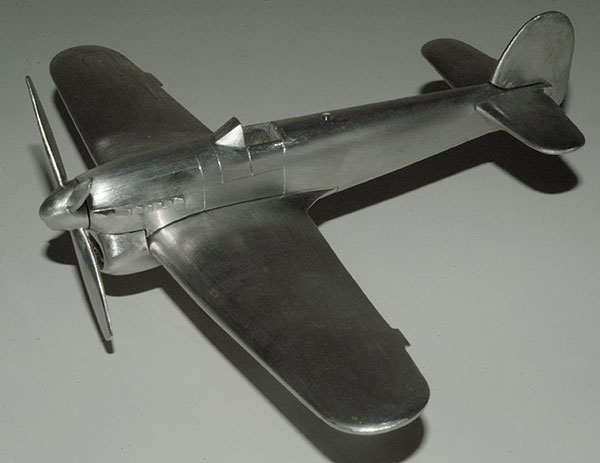
The rear view shows the traditional eliptical wing of the Spitfire now fitted with its 20mm cannon and necessary wing blisters.
March 7th 2014
Sculpting for the Spitfire Mk IX has gone well this week. The following photos will give you an idea of how I tackle the metal masters.
The first photo shows a raw casting of the wing against the plan in 1/48 scale. As you can see it is oversize this is because it is what we call a ‘generic’ Spitfire wing allowing us to use it to sculpt any Spitfire wing profile. This casting is from a silicone mold and is very coarse with no detail.
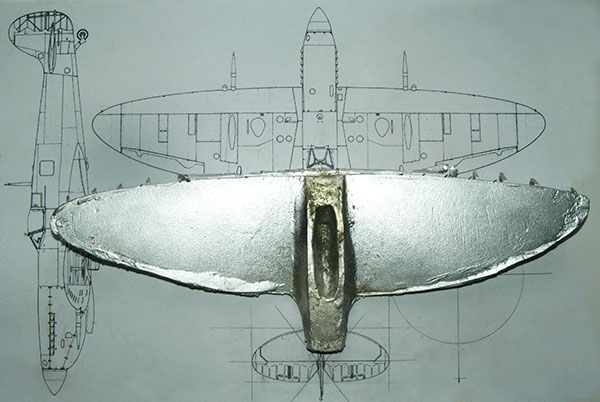
In the second photo you can see the basic shape of the eliptical wing is now established and is being refined to get it to match the plan. You can see from the rough file marks on the left hand wing I do get involved in a fair bit of grinding, sawing, and filing at this stage.
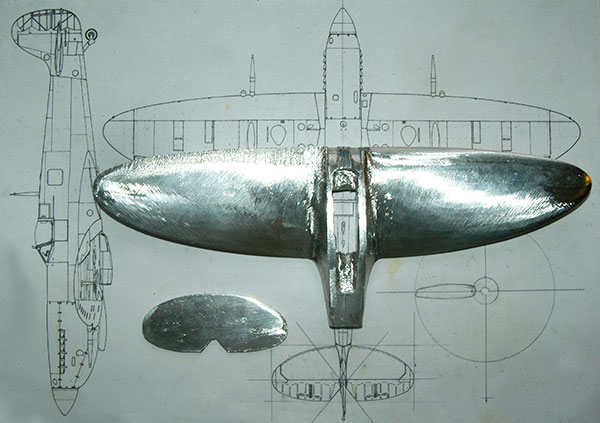
The third photo shows the same principle but with the fuselage. Again a generic fuselage, here you can really see how coarse the casting quality is at this stage. This is not a problem as the castings are allways oversize and the roughness can be filed out to get the master to match the plan. There are a lot of subtule cuves around the engine of the Spitire Mk IX these have been very complicated to recreate but I am pleased with the result so far.
In the final photo the fuselage and wing are fitted together and other components are in various stages of being reprofiled and fitted. The chin and intake have inparticular taken a lot of time to get right.

March 3rd 2014
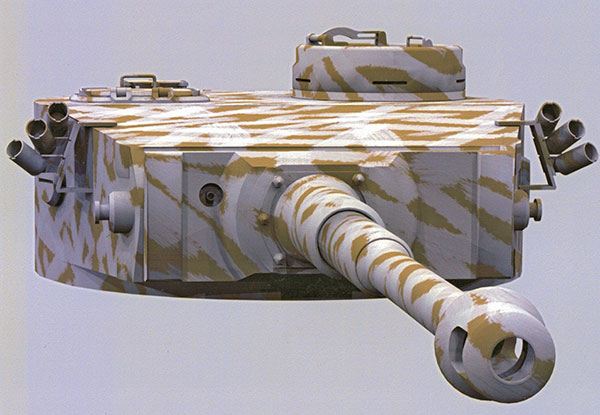
I have just had a very interesting weekend looking at future technology. Some of you may have heard of 3D printing. For those of you who have not it allows 3D objects created on a computer to be produced in reality. This is not science fiction but has been used in industry for several years. Formula 1 teams now use 3D printers to create spare parts for their cars and it is widely used in aerospace.
Several years ago I used a 3D modelling program to produce the image below, unfortunately that software is not compatible with 3D printers so I have this weekend started learning some new software. It will be a long slow process but I will be able to use it to sculpt more accurately some of the complex geometric shapes required.
The Tiger turret was just an exercise as it has relatively simple shapes so we won’t be producing a Tiger. For some reason it reminds me of a Dalek!
February 28th 2014
I have just started sculpting the Spitfire Mk IXC after spending a few hours working out what parts I can use from the Spitfire Mk I. It turns out that the only parts I can use will be the undercarriage and seat, everything else will be new. The Spitfire Mk IXC doesn’t just have a bigger engine and a four blade prop, I am discovering a lot more changes than that. It reminds me of a comment a Formula 1 designer who is a customer of ours made ‘If we redesign the rear light on the car, we end up changing the nose as well.’ thankfully pewter aircraft are a bit simpler than an F1 car. I am sculpting a new generic fuselage for the Spitfire which will allow for other Marks in the future. I have got to do a Griffon engined Spitfire (or Seafire), that will look quite a stunning beast.
February 13th 2014
The Mosquito Mk IX has been photographed and added to the website. Tomorrow I start casting our first production batch, we are now in full production.
The Martin Baker MB5 is now sold out and has been moved to the ‘struck off charge’ section where it joins our archive of past aircaft. I often browse the Struck off charge section just to see how far we have come in the past 18 years.
Our next release will be the Spitfire Mk IXC in 1/48 scale as flown on D-Day, signed by Air Commodore Pete Brothers CBE, DSO, DFC*. This will be the first aircraft in our D-Day 70th anniversary collection.
February 8th 2014
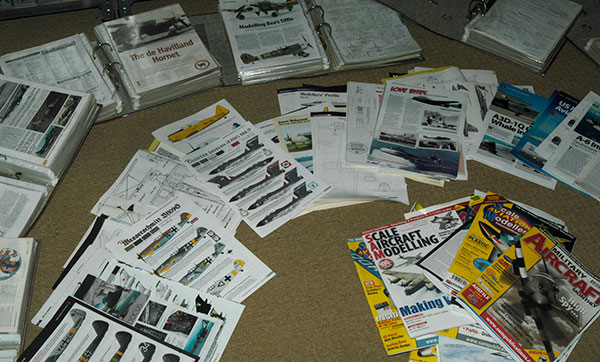
What to do on a wet weekend? We have over the years set up an extensive library which has been added to every few months by the destruction of aircraft / modelling magazines. I carefully tear out the articles and plans of aircraft we want to do in the future and file them in clear plastic sleeves which are then put in folders. Then when the time comes I have all the information together in one place. What’s left over goes to the recycling. So those stacks of magazines we all have will be put to good use in the future.
February 7th 2014
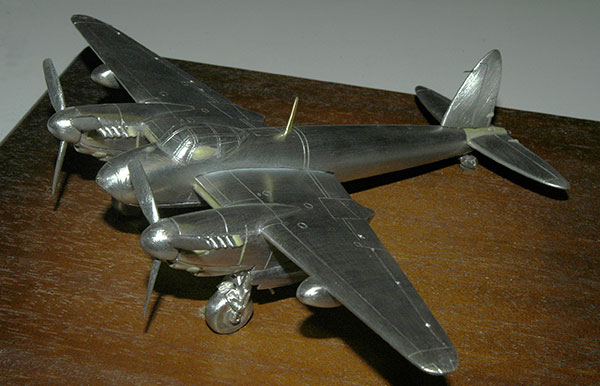
Well what a difference a week makes. The Mosquito masters are now finished and I am really pleased with the result. Aircraft like the Mosquito which have such complex curves and relatively little surface detail are very difficult to sculpt. This is because just getting it dimensionally accurate isn’t enough, the complex curves have to be ‘tuned’ by eye to get the character right. I think I have got it about right, quite a change from last week. I shall come back to it afresh on Monday for a final check, and then make the production molds.
February 4th 2014

I had a bit of a disaster with the Mosquito the other day. I discovered that the angle of the engines relative to the centreline was out, basically the nacelles were pointing uphill. After an anxious night I worked out a solution, the wing was in the right place, and at the right angle so it was deifinately the nacelles. I decided to use a hacksaw to cut about 3/4 of the way through each nacelle from underneath and then bend the nacelles down to the correct angle. Surprisingly it went really well, you can see in the photograph where the saw cuts were (now filled with Milliput).
It is allways a major stage to get the aircraft on its undercarriage, it then starts to come together and you can quickly tell whether you have got it right (or not). The underside of the nacelles, bomb bay and fuselage fillet are not fitted in this photograph so it does look a bit lean. Overall I am pleased with progress so far, despite the odd disaster.
January 30th 2014
Work on the metal masters is going well. So far I have just been working on the fuselage, wing and nacelles. With the wing fitted to the fuselage you can really start to see the character of the Mosquito coming through. I am experimenting with a new construction design which so far seems to be working out well, requiring more careful sculpting but will make a better final model.
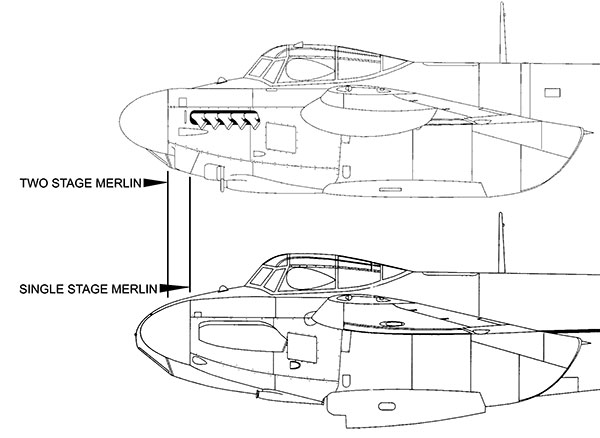
Initially Mosquitos were fitted with single stage Merlin engines but as the war progressed Mosquitos like Spitfires and Hurricanes were fitted with the two stage supercharged Merlin resulting in better performance but longer nacelles as you can see in the comparison drawing. Our Mark IX will feature the two stage Merlin.
On this day in 1943 Mosquitos from 105 and 139 Squadrons carried out the first daylight raid on Berlin, disrupting Goebels broadcast.
January 28th 2014
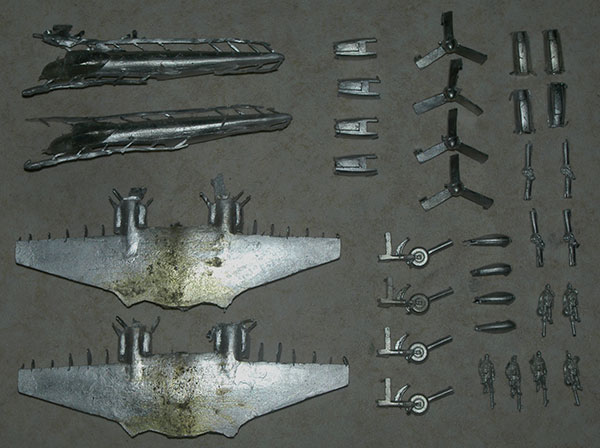
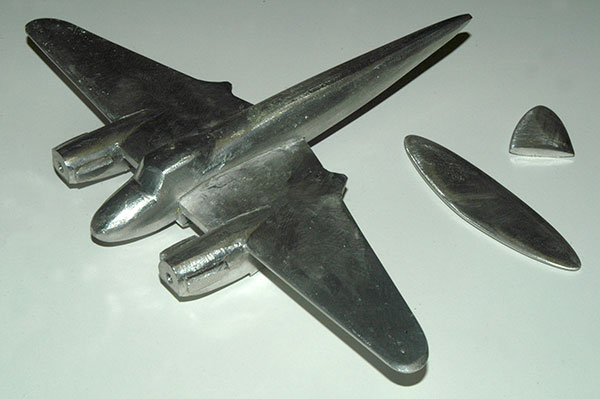
The metal masters for the Mosquito have now been cast. Several castings of each part are taken.
The best quality castings are selected to be worked on to create the final masters. The horizontal and vertical tails were cut from blanks and are already the corrrect profile. Castings from other aircraft will be adapted to form the bomb bay and fuselage fillet.
January 23rd 2014
Just poured the second half of the Mosquito molds. So tomorrow I shall be cutting molds and casting the metal masters. Then it is time for a lot of filing – the stage I most enjoy, when the aircraft really comes alive.
January 22nd 2014
It has been a busy day today. I have finished the Mosquito Milliput masters, poured the first half of the silicone molds and cast blanks for the horizontal and vertical tails. The black and orange is Plasticeine forming the base of the molds ready for the silicone to be poured. Tomorrow I shall pour the second half of the molds and cut the tail parts fronm the blanks. I thought you might like to see a close up of the nose art for the Mosquito. The actual size will be about that of a thumbnail, only possible with high quality decal printing.
January 15th 2014
First of all may I wish you all a belated very Happy New Year. Between the festivities I have been sculpting and originating decals for our 2014 releases.
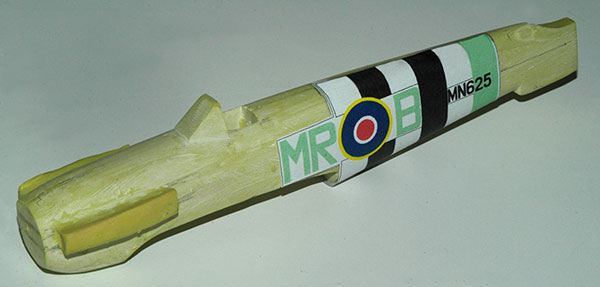
This year we are commemorating the 70th anniversary of D-Day or ‘Operation Overlord’. Our big release (in every sense) will be our 1/48 scale Hawker Typhoon Mk IB with full invasion stripes and rockets. The Typhoon poses problems with its decals as they have to be designed to wrap around the aircraft and look straight. This is despite the fact that D-Day stripes on actual aircraft were rarely straight or neat.
To create the fuselage stripes I begin by marking up the fuselage master in pencil with an outline of where the stripes are on the fuselage. Then I apply a film of sticky backed plastic around the fuselage and trim it back to the pencil lines with a scalpel.
The sticky backed plastic is then removed from the master, stuck to a sheet of paper and scanned into the computer. The scanned image is then traced and the stripes and characters are added using CorelDraw software. Artwork is created for both sides of the fuselage.
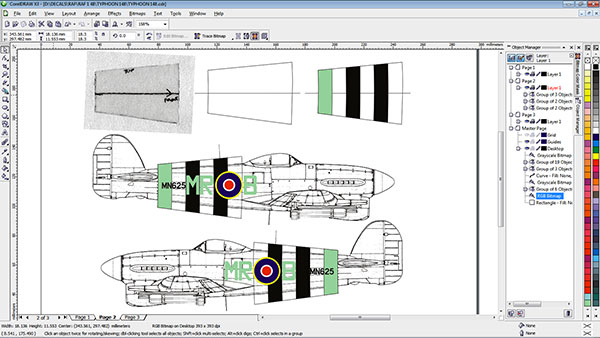
The artwork is printed out and fitted to the fuselage to be checked, and any alterations are made.
All I have to do now is fill up the decal sheet with lots more interesting aircraft. Back to the books then.